

The glass block window vent was the third idea I tried in my basement apartment. The first was a floor fan. It pushed the musty air around in a circle and made the room feel like a wet closet. The second was leaving the casement cracked overnight. By month two, I had mosquitoes in the room and a black ribbon of mold along the sill. Then a neighbor three doors down showed me her vented glass block. She had replaced a single block with a vented one, and her basement stopped smelling like a cave by the end of the first week. That one swap sent me down a four-install rabbit hole, and two of those installs I'd never do in a rental again.
Why I Wanted One in the First Place
My basement apartment came with three things: a single casement window the size of a coffee table, a dehumidifier that ran constantly, and a smell I could only describe as old tennis shoes left in a sauna. I tried candles. I tried baking soda in mason jars on every shelf. I tried one of those plug-in essential oil warmers. Nothing touched the smell because the problem wasn't the air inside, it was the air not moving. A glass block window vent solves the air-movement problem in a way that doesn't ask your landlord for permission, doesn't drill a hole in the masonry, and doesn't put a security risk in the egress window.
There are three concrete scenarios where a glass block window vent earns its place in a rental. One: the only window in the bathroom or kitchen is a fixed pane and there's no exhaust fan. Two: the apartment sits below grade or partially below grade, and the radon or humidity reading was the reason the last tenant left. Three: the existing window is a single-pane aluminum frame that's already loose in the opening, and a full replacement would actually cost less than resealing the original. In all three cases, the vent is a stopgap that buys you two to three years of breathable air before the building envelope needs real work.
The 4 Installs I Tried (And the 2 I Wish I Hadn't)
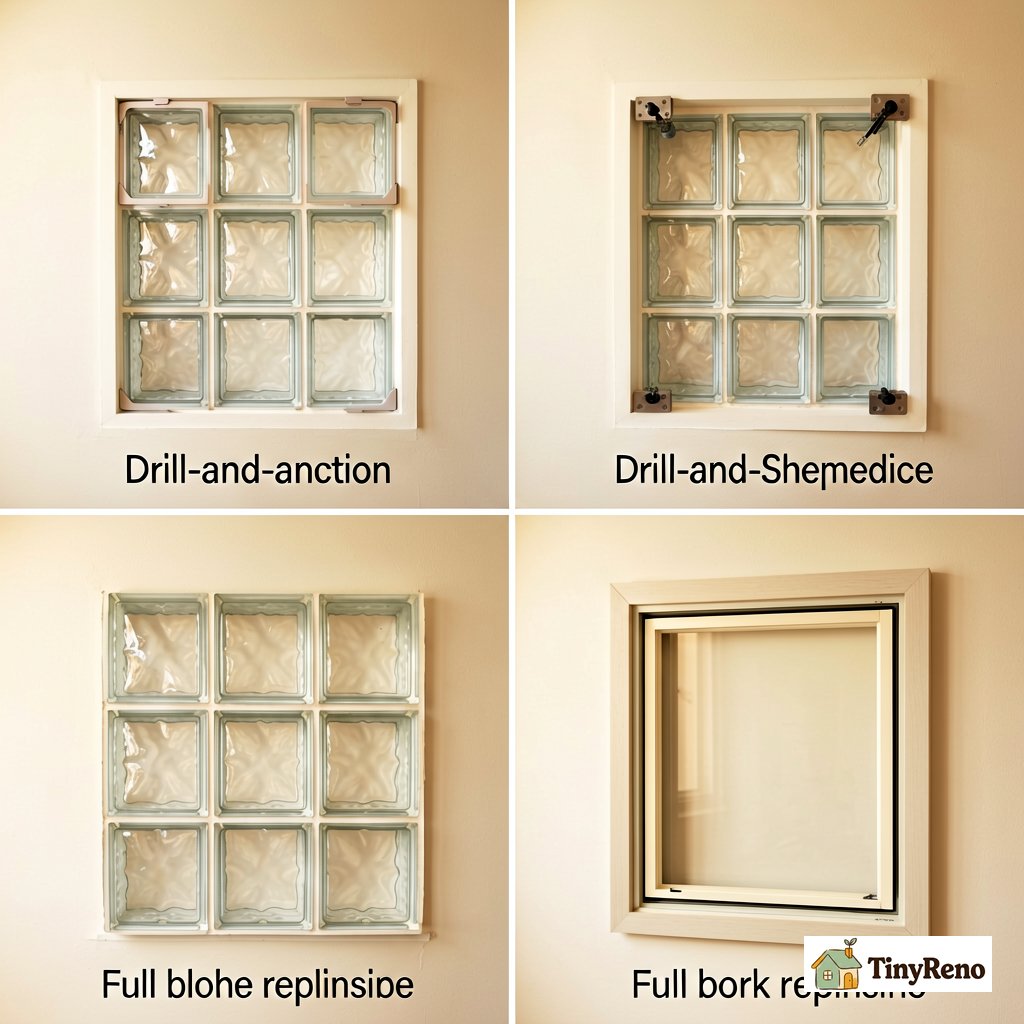
Install one was the clip-on vent. It's a plastic rectangle with a honeycomb grille that sticks to the interior side of an existing glass block with included adhesive tabs. Cost was about $14, install took 8 minutes, and I needed a hair dryer and a rag to clean the glass before the adhesive would actually grip. The airflow was real but minor — maybe 10 percent of what a cracked casement would give you, and you can hear conversations from outside as clearly as if the window were open. I kept this one for six months in a bathroom with no other ventilation option. It worked. The adhesive eventually yellowed and the clip fell off during a thunderstorm in month seven, but for a $14 stopgap, that's a reasonable lifespan.
Install two was the drill-and-anchor masonry vent. This is a metal louvered box that you drill into the mortar joint between two existing glass blocks, slide in a sleeve, and seal with exterior silicone. Cost was about $45 for the vent plus $20 in masonry drill bits I broke through. The airflow was three to four times better than the clip-on. The problem was that the lease specifically forbade drilling into the exterior masonry, and I only learned this when my landlord walked the building in month four. He didn't make me repair it, but the security deposit conversation that followed was the kind of conversation I didn't want to have. If your lease is silent on masonry drilling and your landlord is the type who doesn't walk the building, this is the install that actually moves air.
Install three was the full block replacement. This is the install my neighbor had done professionally — a single glass block is removed, a vinyl-framed vented glass block is set in its place with mortar, and the exterior is finished to match. Cost was $280 including labor, and it was the only install that felt like a real building modification rather than a renter hack. The airflow matched a small bathroom exhaust fan. The down side is that it's not a renter project — this requires a mason, it requires landlord permission in writing, and it modifies the building envelope in a way that survives your lease. If you're an owner, this is the install. If you're a renter, skip to install four.
Install four was the interior framed insert. I built a 2x2 frame to fit inside the existing window opening, mounted a vented glass block in the center of the frame, and sealed the frame to the interior sill with removable foam tape. The whole thing pops out in 10 minutes when I move, leaves no marks, and the frame is light enough that I store it in the closet over the summer. Cost was $62 for the block, frame lumber, foam tape, and a can of satin paint to match the trim. Airflow is about 70 percent of install three. This is the one I'd recommend to a renter who can't drill, can't get landlord permission, and can't tolerate the clip-on's noise leak.
The two installs I'd skip. The first is any vent that requires drilling into the glass block itself. The blocks will crack. I tried it on a scrap block I had from another project and the crack ran corner to corner on the first pilot hole. The second is the magnetic screen-style vent that promises "no tools, no drilling." It needs you to mount a metal plate to the exterior of the building, which is exactly the kind of thing your lease forbids and the kind of thing that will fall off the building in February and land on your downstairs neighbor's patio furniture.
What Actually Worked in My Apartment
Install four is the one I kept. It's reversible in 10 minutes, it doesn't modify the building, and the airflow is good enough that I turned the dehumidifier down two notches and stopped emptying it every three days. The trick that made it work was the foam tape — I ran a continuous bead along the entire frame-to-sill contact line, not just the corners. Without that seal, the air just comes around the frame and the vent becomes a decoration. With the seal, the vent becomes the only path for air to enter, and the room pressure equalizes through it the way it would through an open window.
One renter-to-renter note. If your existing window is a sliding casement or a double-hung, you almost certainly don't need a glass block window vent. What you need is a sash lock repair and a roll of weatherstripping — the same approach covered in this $3 hinge screw fix will close the air gaps around a sash that most renters blame on the wall. The vented block install is for windows that don't open, or windows that are already broken in a way that the landlord won't fix.
If You Only Have 30 Minutes and a $60 Budget
Buy one vented block, four 1x2 pine boards, a tube of removable foam tape, and a small can of satin trim paint. Cut the boards to fit the inside of your existing window opening with a 1/4 inch gap on all sides. Mount the block in the center of the frame. Run foam tape along the back of the frame. Press the frame into the opening. Paint the visible edges to match the trim. Total time: 30 minutes if you have a saw, longer if you don't. Total cost: about $62. Reversal at move-out: 10 minutes, no marks, no deposit conversation. This is the only glass block window vent install I'd recommend to a renter in 2026.
If your casement is the kind that simply needs a $3 hinge screw adjustment to actually close all the way, fix that first — it's a 90-second job and the air leak is usually bigger than any vent can compensate for. This install is the right answer when the window doesn't open, not when the window doesn't seal.


Discussion (0)
Sign in to join the discussion