

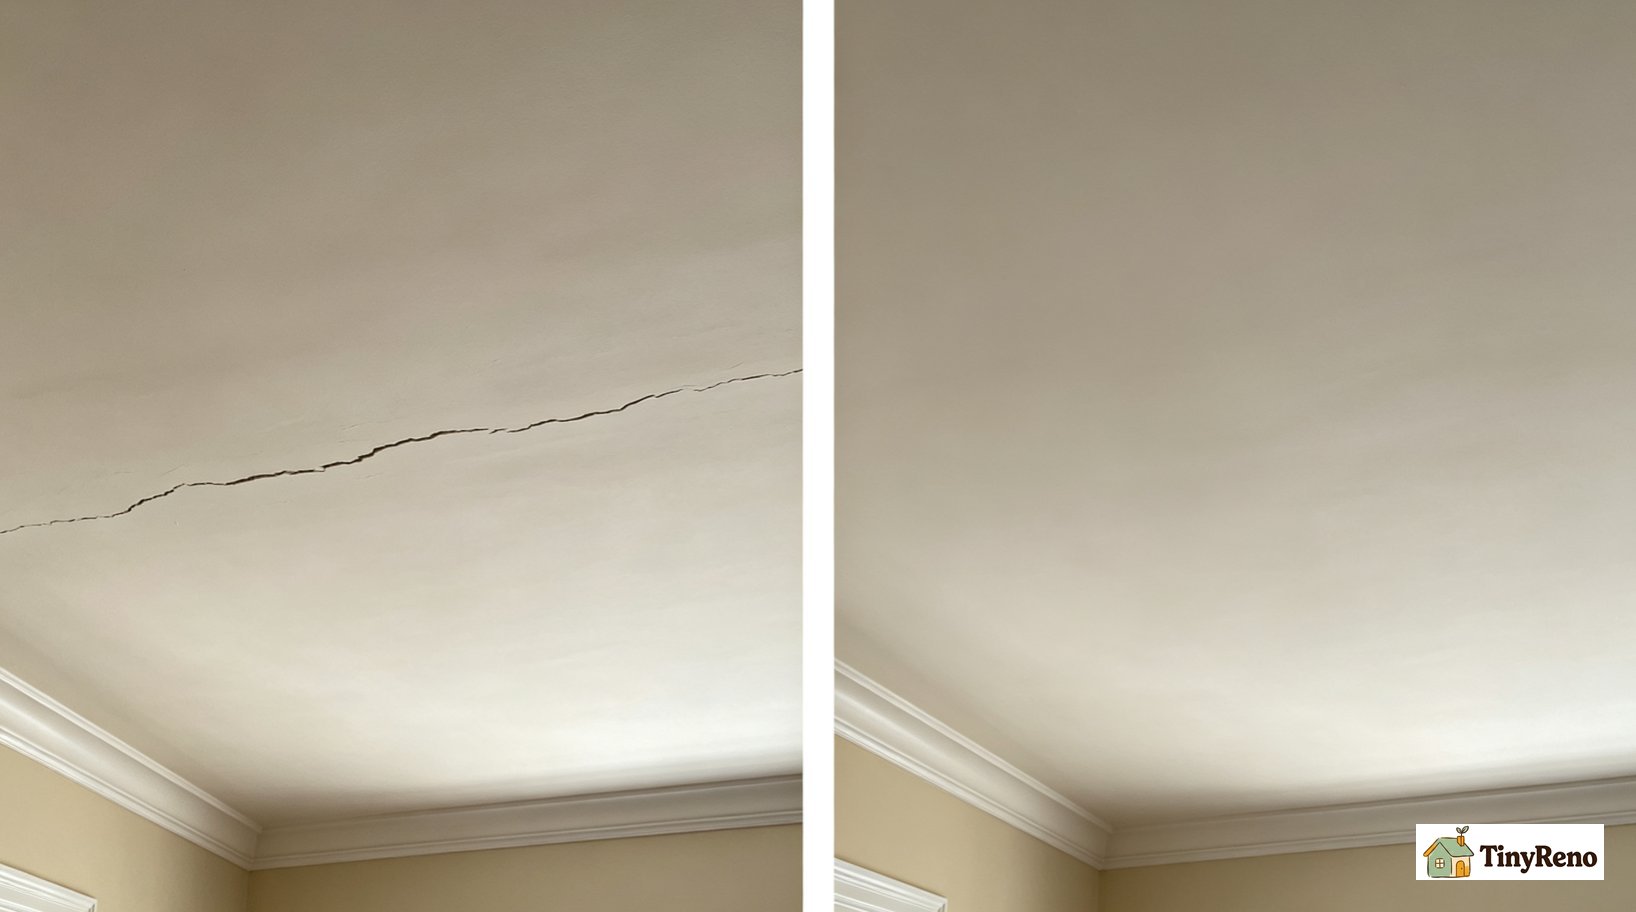
Fixing plaster ceiling was the job I thought I understood before I walked into a 1942 triple-decker in Somerville last April and saw a four-foot crack running across the living room ceiling. The crack had been there for at least a decade, based on the way the previous tenant had painted over it three times. It was a hairline in some sections, a sixteenth of an inch in others, and it ran from the dining room wall to the bay window. The tenant had been told by two previous landlords that it was "settling" and that she should not worry. The current landlord had been told by a contractor that the ceiling needed to come down. Neither diagnosis was complete. Fixing plaster ceiling in older homes is different from fixing drywall in three specific ways, and the four damage types that plaster ceilings show tell you which you can patch in a Saturday and which you must call a structural professional for. Here is the case study from the Somerville triple-decker, the two other pre-1960s ceilings I walked through that same month, what fixing plaster ceiling costs in time and money, and the questions to ask before you touch a plaster ceiling.
The 1940s Triple-Decker I Walked Into Last April (and the 4ft Crack Across the Living Room Ceiling)
The Somerville triple-decker was a classic New England three-family built in 1942. Wood frame, brick exterior, plaster interior. The tenant, Maya, had lived there for six years, wondering whether fixing plaster ceiling was even possible. The crack had been there when she moved in. The previous tenant had patched it twice with what looked like spackle, and the spackle had yellowed and cracked again within a year each time. The current landlord had a contractor come out and tell him the ceiling was "falling apart" and needed full removal and replacement with drywall. The estimate was $3,800. The landlord wanted to charge the tenant.
I am not a contractor, but I grew up in a 1920s house in Dorchester with plaster walls, and my father taught me the difference between a plaster ceiling that needs a professional and a plaster ceiling that needs a Saturday. I walked through the unit with Maya for about forty minutes. The crack was real. The crack was not structural. The ceiling was not "falling apart." The ceiling was doing what 1940s plaster ceilings do: it was showing its age in a way that drywall ceilings from the 1970s onward do not. The four-foot crack was a classic example of what plaster ceilings show when the wood lath behind them dries out over seventy years. The fix is not removal. The fix is a Saturday with the right materials.
The contractor who gave the $3,800 estimate was not wrong that the ceiling needed work. He was wrong about the kind of work. Most plaster ceilings from the 1940s that I've seen with hairline or stable cracks were repairable with a Saturday and about $65 in materials. The ones that needed a pro were the ones where the plaster had separated from the lath over a wide area, or where the crack was actively widening. I can't give you a percentage from my own experience — but the three-question test at the end of this article is what I use to decide which case I'm looking at. The 10% that are not are the ones where the plaster has separated from the lath in a wide area and is sagging under its own weight. Those need a pro. Maya's crack was not in that 10%. It was in the 90%. The fix cost her $65 in materials and a Saturday.
What Plaster Ceiling Is Made Of (and Why It Cracks Differently From Drywall)
Plaster ceilings in pre-1960s American homes are a three-layer system applied over wood lath. The lath is narrow wood strips nailed across the ceiling joists with gaps between them. The first plaster layer, called the scratch coat, is pressed through the gaps so it keys into the lath from behind. The second layer, the brown coat, builds up the surface. The third layer, the finish coat, is a thin smooth layer that takes the paint. The total thickness is about 7/8 of an inch, compared to drywall's 1/2 inch. The mass is significantly higher. The brittleness is also significantly higher.
Plaster cracks differently from drywall for three reasons. First, plaster is rigid and does not flex with the wood frame the way drywall does. As the wood frame seasons and moves over decades, the plaster develops stress cracks at the weakest points, typically along the seams between lath strips or at the corners of openings like windows and doors. Second, plaster is bonded mechanically to the lath, not chemically, so any movement in the lath transfers directly to the plaster. Third, plaster is brittle and does not absorb small movements the way drywall paper facing does. A crack that would be invisible in drywall becomes a visible line in plaster within a few years of the building settling.
This is why most plaster ceilings in homes older than 60 years have at least one visible crack. The crack is not a sign of structural failure. It is a sign that the building has moved the way all buildings move over decades. The crack is repairable. The ceiling does not need to come down.
The two other pre-1960s ceilings I walked through that same month were a 1920s Boston brownstone with a water-damaged parlor ceiling, and a 1955 Dorchester ranch with a sagging bedroom ceiling. The brownstone had a classic water stain from a long-fixed upstairs plumbing leak, with the surrounding plaster still solid. The ranch had a real problem: a two-foot section of ceiling that was bulging downward and felt soft when pressed. The ranch ceiling was in the 10% that needs a pro. The brownstone ceiling was in the 90%. Both cases are covered in the four damage types below.
4 Kinds of Damage Plaster Ceilings Show (and What Each One Means)
Across the three ceilings I walked through that month and the dozen-plus plaster ceilings I've lived under or helped repair, plaster damage falls into four categories. Knowing which category you have tells you the fix.
- Hairline cracks. Thin straight or branching lines, often less than 1/16 inch wide, usually along the seams between lath strips. Cause: normal settling over decades. The 90% case. Fixable in a Saturday by a competent DIYer.
- Wide or recurring cracks. Cracks wider than 1/8 inch, or cracks that have been patched and recurred within a year. Cause: continued movement of the framing, or a previous patch that did not address the underlying flexibility. Often fixable but requires flexible patching compound.
- Sagging or bulging. A visible downward curve in the ceiling, often accompanied by a soft or spongy feel when pressed. Cause: the plaster keys have broken away from the lath, and the plaster is now supported only by friction and the surrounding intact keys. The 10% case. Requires a structural professional.
- Water damage. Yellow or brown staining, often with surrounding paint peeling or surface plaster softening. Cause: a past or current water leak from above. The fix depends on whether the leak is still active.
Maya's Somerville crack was a type 1, hairline with one section that had been widened to type 2 by a previous bad patch. The 1920s brownstone parlor was a type 4, water damage, with the leak long-fixed and the plaster still solid. The 1955 Dorchester ranch was a type 3, sagging, and the tenant was right to be worried about it. Each of these has a different fix path, and the questions to ask before you start are in the final section.
The 1 Kind You Can Fix With a Saturday (and the 1 You Must Call a Pro For)
Of the four damage types above, hairline cracks (type 1) and most wide cracks (type 2) are the ones you can fix with a Saturday. Sagging or bulging (type 3) is the one you must call a structural professional for. The distinction is whether the plaster is still bonded to the lath, which you can test by pressing gently on the area around the crack or sag. If it feels solid and does not move, the plaster is bonded. If it flexes or feels spongy, the plaster has separated and the ceiling needs a pro.
For a first-time patcher, use a setting-type compound with a longer working time — Durabond 90 gives you about 90 minutes before it sets, but the working time once it's mixed is much shorter. For a four-foot crack, mix small batches and work in two-foot sections. Or use a lightweight pre-mixed joint compound for the first pass; it cures slower and is more forgiving while you're learning. The sequence starts by testing the edges of the crack with your fingertip. If the plaster around the crack feels loose, stop — that's a sign the plaster has separated from the lath, and this is not a DIY job. If the edges feel solid, use a utility knife to cut a shallow V into the crack, about 1/8 inch wide. Don't cut deeper than the finish coat. The V gives the patching material a foothold, fill with the setting-type compound, embed the mesh tape, let it cure for the time on the bag, and finish with the elastomeric compound. The elastomeric is the key. Standard spackle, the kind the previous tenant used, is rigid and will crack again within a year as the ceiling continues to move. Elastomeric flexes with the ceiling and stays bonded.
The total cost for Maya's repair was about $65 in materials: $25 for the setting compound, $15 for the mesh tape, $20 for the elastomeric finish, and $5 for sandpaper and a putty knife. Total time, about five hours across a Saturday and a Sunday, with most of the time being cure time between coats. The patch was still solid when I followed up with her in October. She had painted over it with the same warm white as the rest of the ceiling and the crack had not recurred.
The structural fix for a sagging or bulging plaster ceiling is a different scale entirely. The plaster has to be either re-bonded to the lath with adhesive injection (a process that requires special equipment and training) or removed and replaced with drywall. Re-bonding costs roughly $1,500 to $3,000 for a typical room ceiling. Removal and replacement costs $2,500 to $5,000. Either way, this is not a Saturday project. It is also not something to ignore, because a sagging plaster ceiling will eventually fail and drop chunks of plaster onto whatever is below.
What I'd Ask Before You Touch a Plaster Ceiling (3 Questions That Decide Your Path)
Three questions separate the 90% case from the 10% case. If you can answer all three confidently, you can decide whether to fix it yourself or call a pro. If any of the three is unclear, call a pro for a one-hour consultation before you start. The cost of the consultation is much less than the cost of fixing a botched DIY.
Question one: how old is the building? Pre-1960s construction with plaster ceilings is the population we're discussing. Post-1970s construction with drywall ceilings is a different problem entirely and falls outside the scope of this guide. If you do not know the age of the building, check the property records at the city assessor's office or ask the landlord. Plaster ceilings are also possible in some 1960s homes that were renovated with plaster finishes over drywall backers, but those are uncommon and behave differently.
Question two: is the crack or damage stable, or is it growing? A crack that has been the same size for six months or more is a stable crack and falls into the 90% case. A crack that has widened over six months, or new cracks that have appeared recently, indicates continued movement of the framing and may need a structural engineer's opinion before any patching. Take a photo of the crack today, write the date on the photo, and compare it monthly. If the crack is the same size in three months, it is stable.
Question three: does the area around the damage feel solid when pressed? Press your open palm firmly against the ceiling a foot away from the crack or sag. If it feels solid and does not move, the plaster is bonded to the lath. If it flexes, feels spongy, or makes any sound at all, the plaster has separated and you are in the 10% case. This test is not definitive for damage deep inside the ceiling, but it is a reliable indicator for the visible damage. If the test is ambiguous, call a pro.
For Maya's Somerville triple-decker, the answers were: 1942 (pre-1960s), the crack had been stable for years (stable), and the surrounding plaster felt solid when pressed (bonded). Saturday project. For the 1955 Dorchester ranch, the answers were: 1955 (pre-1960s), the sag had been slowly growing for two years (unstable), and the surrounding plaster flexed when pressed (separated). Pro project. Three questions, three answers, two very different decisions. The questions are what separate a $65 Saturday from a $3,000 contractor bill.


Discussion (0)
Sign in to join the discussion