

Hole covers for walls weren't on my radar until the morning I came home to find my landlord's handyman had patched the doorknob hole in my bedroom — with what looked like a tile of sheet rock and four screws. I was three months from move-out. The deposit I'd worked to keep intact was now visibly at risk. The patch was the right idea. The execution was the problem.
That's the lesson every renter learns the hard way: a hole in drywall isn't just a hole. It's a choice about what kind of patch survives the next tenant's move-in inspection. The five hole covers I tested over six apartments fall into two camps — the ones that hide the hole and the ones that draw attention to it. Here's how to tell them apart before you buy.
Why Most Hole Covers Fail the Move-Out Inspection
The move-out inspection is where your deposit is decided. The inspector walks every wall with a flashlight and a phone camera. They mark anything that looks new, anything that doesn't match, anything that could be questioned in a dispute. A hole cover that looks obvious gets flagged. A hole cover that blends in doesn't.
Most renter-grade hole covers fail this test for one of three reasons. The texture is too smooth against a textured wall. The color is too white against a painted wall. The shape is too round against an irregular hole. I've had all three happen to me.
The cheap plastic disk covers — the ones sold in dollar-store kits — are the worst offender. They're shiny, they're the wrong color, and they look like stickers. The landlord sees them and knows what you did. The better choice is a hole cover that either matches the wall texture or makes the patch look intentional, like a fixture plate.
The 5 Hole Covers I Tested (and the 3 That Looked Terrible)
I tested five types across six apartments over four years. Three of them I removed within a week because they looked worse than the hole did. Two stayed because they actually disappeared.
| # | Type | Cost | Skill | Move-Out Survival |
|---|---|---|---|---|
| 1 | Plastic disk cover | $3 | None | Fails — looks like a sticker |
| 2 | Magnetic wall plate | $12 | Drill | Mixed — works only if hole is round |
| 3 | Self-adhesive mesh patch | $5 | None | Passes — blends with paint |
| 4 | Drywall repair patch kit | $18 | Sanding | Passes — disappears into wall |
| 5 | Decorative hook plate | $8 | Drill | Passes — looks intentional |
The self-adhesive mesh patch and the drywall repair kit were the only two I'd buy again. The decorative hook plate is a special case — it works because it looks like something the tenant intended to install, which inspectors don't flag. The magnetic wall plate and the plastic disk both failed for the same reason: they looked like they were trying to hide something, which is exactly what draws the inspector's eye.
The Mesh Patch (Tier 1: Small Holes Under 2 Inches)
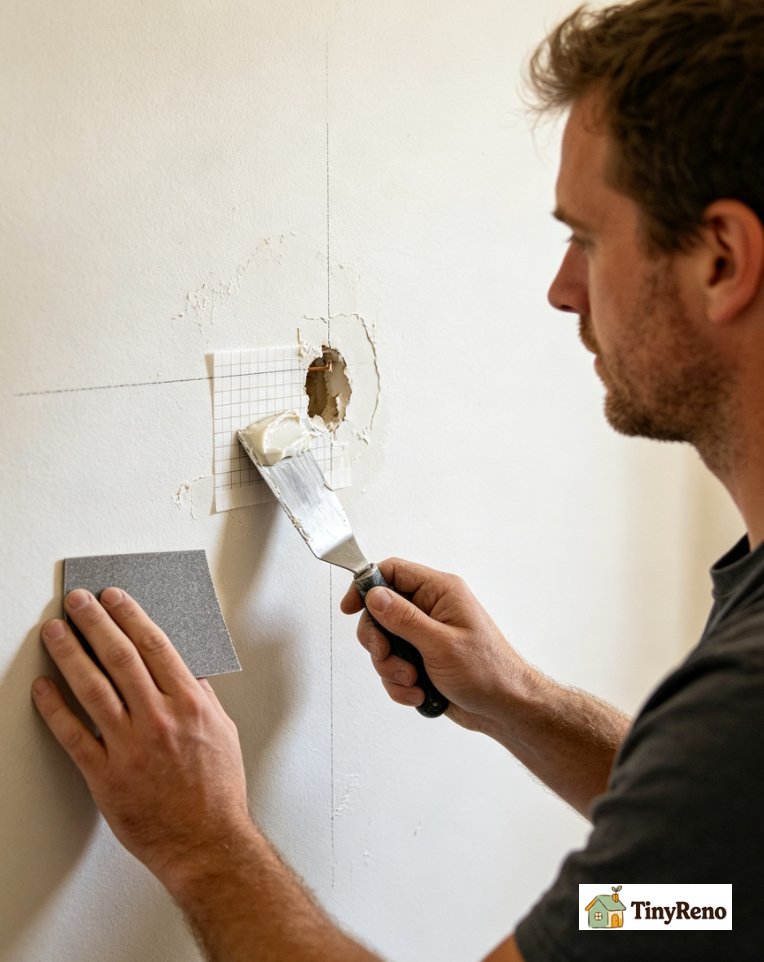
For nail holes, anchor holes, and small doorknob punctures, the self-adhesive mesh patch is the cleanest answer. It's a small square of aluminum mesh with a sticky back. You press it over the hole, spread a thin layer of joint compound over it with a putty knife, let it dry for two hours, sand it smooth, and paint.
The trick most people miss is the second coat. One coat leaves the mesh texture visible. A second thin coat, applied perpendicular to the first, fills the texture completely. Sand lightly with 220-grit between coats. The whole job takes an afternoon but produces a patch that disappears.
What I learned the hard way: don't use spackle on holes bigger than a quarter. Spackle shrinks as it dries, and a deep spackle fill cracks at the edges within a week. Mesh plus joint compound holds. Spackle alone fails.
Cost breakdown: $5 for a 4-pack of mesh patches at any hardware store. A small tub of joint compound is $8 and lasts a dozen patches. A can of matching wall paint is another $10 if you don't already have it. Total for a small hole: under $25 and three hours.
The Drywall Repair Kit (Tier 2: Holes 2-6 Inches)
For doorknob holes and small punctures around 2 to 4 inches, the drywall repair kit is the right answer. Once you get past 4 inches, the patch alone may sag — you'll need to add a backing board or wood strip behind the wall to support the filler. At that point, it's still doable, but it's no longer a one-afternoon job. These kits come with a 4-by-4-inch or 6-by-6-inch piece of drywall and an adhesive backing that sticks to the wall around the hole. You press the patch over the hole, cover with joint compound, sand, paint.
The kit works because the patch is real drywall, not mesh. When you paint it, it accepts paint the same way the surrounding wall does. There's no texture mismatch, no edge ring, no plastic sheen. After three coats of compound and two coats of paint, the patch disappears.
The mistake I made on my first kit: I didn't cut the hole to a clean square first. A ragged hole around the patch shows through every coat. Use a utility knife to square off the hole before applying the patch. A 1-inch border of clean drywall around the patch makes the joint compound feather out smoothly.
The time cost is the catch. A 4-inch patch takes 24 hours to fully cure between the first and second coat, plus another 24 hours before painting. Plan for three days. Don't rush the cure time. A patch that looks fine on day one can crack on day thirty if the compound wasn't fully dry.
The Decorative Hook Plate (Tier 3: Holes You Can't Hide)
For holes that are too large or too irregular to patch cleanly, the move-out strategy changes. Instead of trying to hide the hole, you give it a reason to exist. A decorative hook plate — a brass or nickel plate with a single hook — installed over the hole makes the patch look like a fixture. Inspectors don't flag fixtures. Inspectors flag patches.
This is the renter's version of "make the stain look like the design." It works because the plate is at eye level, it's visually obvious as hardware, and the landlord already has hooks in other rooms. The inspector sees the hook and moves on.
I used this strategy in an apartment where the previous tenant had pulled a TV mount and left four ragged holes in a square pattern. The hook plate covered all four holes and looked intentional. Cost: $8 for the plate, $4 for a wall anchor, ten minutes to install with a drill. The deposit came back in full.
The one catch: the hook plate only works if the holes are clustered. A single hole in the middle of an empty wall looks suspicious. A cluster of holes covered by a plate looks like a feature.
One limitation: a hook plate only works if the holes are close enough to be covered by the plate, and if a hook in that spot actually makes sense. Mounting a hook at knee height because that's where the hole is looks worse than the hole did. Use this trick only for holes at a plausible fixture height.
What About the Plastic Disk Cover?
The plastic disk cover is sold in every dollar store and most hardware aisles. It's a small white circle with self-adhesive backing. You stick it over the hole and paint it the wall color. In theory, it should disappear.
In practice, the disk fails three ways. First, the surface is glossy plastic — paint doesn't adhere evenly and the gloss shows through. Second, the edge is visible as a slight ridge under paint. Third, the color of the disk itself is bright white, so any paint that doesn't fully cover leaves a tell-tale circle.
I tested one in my second apartment, painted it twice, and removed it after a week because every visitor asked what the white circle on my wall was. If I couldn't fool my friends, I couldn't fool an inspector.
The disk is fine for an interior closet wall where no one looks closely. For any visible wall, skip it.
How to Match the Wall Texture
The single detail that separates a passable patch from a perfect one is texture. Smooth walls are easy — joint compound plus sand plus paint gives you a flat surface that matches. Textured walls (orange peel, knockdown, popcorn) are hard. A flat patch on a textured wall looks like a flat patch.
The trick is a sponge. After your final coat of compound is dry but not yet painted, take a damp sponge and dab it against the wall near the patch — not on the patch. This picks up some of the existing wall texture. Then dab the sponge lightly onto the patch itself. The compound picks up the texture pattern.
It's not perfect. A close inspection will reveal the patch. But it converts an obvious flat spot into a close-but-not-exact match, which is usually enough to pass a move-out inspection.
For knockdown texture, a flat putty knife pressed against the wet compound and pulled away can mimic the surrounding pattern, but it takes practice. For popcorn texture, there's no good local fix — any patch will look like a flat spot. In that case, either repaint the whole wall or use a decorative plate. This takes practice. Test on a closet wall first.
Even the best patch will show its edges under raking light from a window or a flashlight held at an angle. The goal isn't invisibility in every lighting condition — it's to pass an inspector walking a room with a flashlight, not a photographer's light. If your patch disappears under normal room light and only shows under an angled LED, you're done. Don't overwork it.
How I Pick Which Hole Cover to Use Now
The decision tree I use:
- Hole under 2 inches → self-adhesive mesh patch
- Hole 2-6 inches → drywall repair kit with squared-off edges
- Cluster of 3+ holes → decorative hook plate
- Smooth wall texture → either mesh or kit works
- Textured wall → kit plus sponge dabbing
- Single hole in middle of empty wall → hook plate or kit, never disk
The disk went in the trash. The magnetic wall plate worked for round holes but failed inspection because the magnet was visible. Most rental situations, the mesh patch or the kit covers 90% of hole problems.
What size hole is too big for a patch kit? Anything over 6 inches usually needs a full drywall replacement, not a patch. For patches, 2-6 inches is the sweet spot. Below 2 inches, mesh is enough. Above 6 inches, the patch sags unless you add backing wood behind the wall.
Do landlords care about small nail holes? Most landlords don't deduct for small nail holes if you filled them. The deduction usually starts at holes that look like doorknob strikes, anchor failures, or anything visibly patched. Mesh patches on nail holes are invisible after painting. The inspector won't flag them.
Can you paint over a plastic hole cover? You can, but it will look like a painted plastic disk, not a wall. The paint doesn't absorb into the plastic. The gloss and edge ring show through. Use mesh or drywall patches instead — they absorb paint like the surrounding wall.
How long does a drywall patch take to fully cure? Each coat of joint compound needs 24 hours to fully dry before the next coat. Most patches need two to three coats. Then paint. Total time from first coat to paint-ready is three to four days. Don't sand between coats unless the surface is visibly rough — over-sanding removes material you need.
The Two-Cover Rule
Most renters need only two hole covers in their toolkit: a 4-pack of self-adhesive mesh patches for small holes, and a single drywall repair kit for bigger ones. Total cost: $23. Total storage: one drawer. Total time saved over a lease: hours of stress about the deposit.
The plastic disk belongs in the trash. The magnetic plate belongs in the toolbox for round holes only. The decorative hook plate is a move-out hack for clusters of holes you can't cleanly patch.
I keep a 4-pack of mesh in my closet and a kit in my hallway closet. Between those two, every hole I've made or found in six apartments has been covered in under an hour, with no visible trace to an inspector at move-out.


Discussion (0)
Sign in to join the discussion