

Nail pops in ceiling showed up on a Tuesday morning, three months into my lease. I was in the kitchen making coffee and noticed a small white bump that was actually nail pops in ceiling near the hallway entrance, the size of a pencil eraser. I assumed it was a paint drip. By Friday, the bump had cracked open and was showing dark gray around the edges. By Sunday, the paint had flaked off and the head of a drywall nail was sitting flush against the ceiling, exposed.
I called my dad. He laughed and said it was a nail pop — the wood framing behind the drywall had shrunk slightly as the building settled, and the nail that had been holding the drywall tight had popped forward by a sixteenth of an inch. The fix, he said, was to hammer the nail back in, spackle over the hole, sand it smooth, and repaint. Total materials: about eight dollars. Total time: about twenty minutes.
He was mostly right. This is the guide I wish I'd had — a nail pops in ceiling walkthrough that tells you which nail pops are renter-friendly, which ones are building-settling-and-not-your-fault, and which ones mean the ceiling needs more work than you can do from a stepladder. Most nail pops in ceiling are a five-dollar problem. A few of them are the visible symptom of a building that's moving more than it should.
What a nail pop actually is
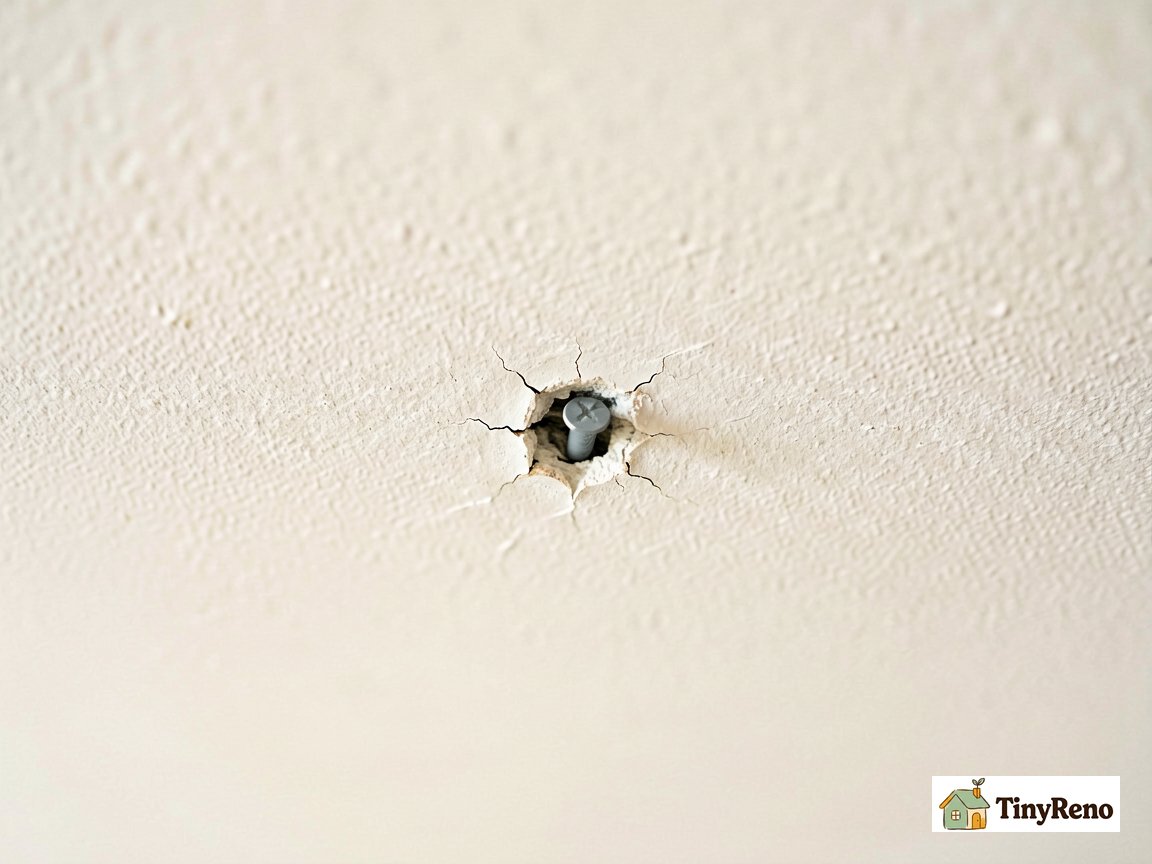
A nail pop is a drywall nail that has worked its way out of the wood framing behind the drywall. The drywall itself is fine. The framing is fine. The nail has just stopped holding as tightly as it did when it was first hammered in. The visible symptom is a small bump or a circle of cracked paint on the ceiling or wall. When you press on the bump, you can feel the head of the nail under the paint.
The cause is usually one of three things. The wood framing has shrunk as the building settled, especially in newer buildings or in buildings that have gone through seasonal humidity swings. The original nail was hammered in slightly crooked, which left the nail head at a slight angle and made it easier for the nail to work loose over time. Or the drywall was nailed instead of screwed, and nails are more prone to working loose than screws are.
The fix is mechanical. You put the nail back in (or replace it with a screw, which holds better), spackle over the hole, sand it smooth, and repaint. The whole job takes twenty minutes if you know what you're doing, longer if it's your first time. The materials cost between six and ten dollars at any hardware store. The skill required is minimal — you can do this with a hammer, a putty knife, a sanding sponge, and a small can of spackle.
The reason is this is a renter-friendly repair and not a landlord-required one is that nail pops are normal settling. Most leases put the responsibility for "minor cosmetic repairs caused by normal settling" on the tenant. For the broader documentation strategy that protects pre-existing ceiling damage from being charged to you at move-out — which includes nail pops, water stains, and the cracks that run between them — the deposit protection walkthrough walks through the photo-and-email chain that makes the difference. The nail pop is the textbook example of this clause. You can fix it yourself, the fix is invisible when you're done, and the fix doesn't change the structure of the apartment.
The tools and materials for one nail pop
For a single nail pop, the materials list is short. You need one new drywall screw (one-and-a-quarter inch, coarse thread, the kind sold as "drywall screws" in a one-pound box for about four dollars). You need a small container of spackle or joint compound (the kind in a four-ounce tub costs about three dollars). You need a putty knife (the one-inch plastic kind costs about two dollars). You need a sanding sponge (medium grit, about two dollars). You need matching ceiling paint (a small sample-size container costs about two dollars, or you can use leftover paint from your move-in if the landlord left any).
Total materials for one nail pop: about thirteen dollars. For two or three nail pops, the cost is about the same because you're buying the same materials in the same quantities. The cost per nail pop drops as you fix more of them in the same session.
You also need a stepladder or a sturdy step stool. Most ceilings are eight or nine feet high, which is reachable with a six-foot stepladder. Don't stand on a chair, a box, or anything that wasn't designed to be stood on. The fall from a chair to a hard floor is the most common renter injury during nail pop repair, and it's completely preventable.
For the actual fix, you need a hammer and a screwdriver or drill with a Phillips head bit. The hammer is for the nail if you're going to use it. The drill is for the screw, which is what I'd recommend for a renter repair — screws hold better than nails and they're less likely to pop again.
The five-minute repair, step by step
Set up the stepladder under the nail pop. Press the bump with your thumb to confirm there's a nail or screw head under the paint. If the nail is sticking out enough to grab with the end of a hammer, hit it back into the framing with two or three light taps. The nail should sink back below the surface of the drywall.
If the nail doesn't want to go back in, or if it wiggles when you push on it (which means the hole has gotten too loose), don't keep hammering. Instead, switch to the screw. Use a stud finder to locate the center of the framing member behind the drywall. Then drive one drywall screw about ½ to 1 inch above or below the original nail hole, staying on that same framing center. That puts the screw into solid wood without disturbing the loose area around the old nail. The screw should bite firmly and pull the drywall back tight against the framing. The original nail can stay where it is — it's not doing any harm buried below the surface.
Once the drywall is tight, you have two small holes to fill: the original nail hole and the new screw hole. Use the putty knife to press a small amount of spackle into each hole. Smooth the spackle flat against the wall. Don't try to fill the holes in one pass — spackle shrinks as it dries, so two thin passes fill better than one thick pass. Let the first pass dry for an hour, then apply the second pass.
Once the second pass is dry (about two hours, or overnight if you're not in a rush), sand the spackle smooth with the sanding sponge. The goal is for the spackled area to be flush with the surrounding wall. Run your hand over the spot — if you can feel the edge of the patch, sand more.
The last step is paint. Brush a small amount of matching ceiling paint over the patch. Let it dry. If the paint doesn't quite match (which is common, because ceiling paint fades over the years), feather the edges by brushing a wider area with very little paint on the brush. The feathering makes the patch invisible from any normal viewing distance.
The whole sequence, if nothing goes wrong, runs about twenty minutes of active work plus two hours of drying time between spackle passes. If you're doing multiple nail pops in the same session, the per-pop time drops to about five minutes of active work.
When nail pops mean something more
There are three cases where nail pops are not a renter-friendly fix and the ceiling needs a professional. The first is when the nail pop is accompanied by a crack. A small crack radiating from the nail pop is normal settling. A long crack running across the ceiling, or a crack that follows the seam between two drywall sheets, may mean the framing is moving more than it should. The framing moving may be a structural issue that the landlord needs to address.
The second case is when the nail pop is one of many. If your ceiling has more than ten nail pops, or if the nail pops are concentrated in one area, the drywall may not be properly secured to the framing. This usually means the original installation was done with too few nails or with nails that weren't seated properly. The fix is a professional rescrew of the entire ceiling, which is a landlord repair.
The third case is when the nail pop is wet. A nail pop with a water stain around it, or with paint that feels soft or spongy, is a moisture issue — but that doesn't always mean a leak. A bathroom ceiling with poor ventilation can also cause this. Before you call the landlord about a leak, check whether the spot feels wet or just damp, and whether it dries out after a day or two of ventilation. If it's still wet or the stain keeps growing, then it's time to report it. The same water that caused the stain is also pushing the nails out of the framing. The water stain timeline walkthrough covers the situation where a nail pop is the visible symptom of a leak.
For the right screws to use on drywall (and which to avoid), the renter repair walkthrough covers it in detail. For each of these three cases, the right move is to email your landlord with photos and a description, and to ask for a professional inspection. Don't try to fix these yourself. The nail pop is the symptom. The cause is the issue.
How do you tell the difference between a settling crack and a structural crack? Settling cracks are thin, short, and usually run in one direction from the nail pop. Structural cracks are wider, longer, or follow a joint between ceiling panels. If the crack opens and closes with the seasons, it's settling. If it keeps getting longer or wider every month, it's structural.
The repair in practice
I fixed five nail pops in my apartment over the course of one Sunday afternoon. The materials cost was eleven dollars total. The stepladder rental from the corner hardware store was free. The time was about two hours of active work plus the spackle drying time, which I let go overnight. The total cost in materials and time was less than the deposit I would have lost if I'd left the nail pops and been charged for them at move-out.
For the broader renter toolkit that covers the small repairs you can do yourself and the ones that are landlord calls, the renter repair walkthrough sorts the categories I keep coming back to. For the strategy that protects pre-existing ceiling damage from being charged to you at move-out — which includes nail pops, water stains, and the cracks that run between them — the deposit protection walkthrough walks through the documentation chain that makes the difference between a deduction and a clean deposit return.


Discussion (0)
Sign in to join the discussion