

The screws for door hinges on my bedroom door had been failing for three months before I noticed. The door started catching the carpet. I'd push it open and the top corner would drag, leaving a faint black streak. I assumed the hinge was worn out. I bought a replacement hinge for twelve dollars at the hardware store, brought it home, undid the four screws — and watched two of them strip the soft pine of the door frame before they came out. I now had a sagging door and a stripped frame. The repair went from a ten-minute swap to a Saturday afternoon with wood filler, a clamp, and a prayer to my landlord.
That was the moment I learned the boring truth: most door problems aren't hinge problems. They're screws for door hinges problems. The hinges themselves rarely fail. The screws holding them do. Once you understand that, the fix becomes a screwdriver instead of a trip to the store, and the price drops from twelve dollars to a couple of bucks at most.
Why the same screw fails in the same door twice
The door frames in most rental apartments are built from finger-jointed pine or particleboard core. The hinge mortises — those shallow pockets where the hinges sit — are usually routed into solid wood, but the screw holes behind them go deeper, into softer material that doesn't grip as well. Every time you open and close the door, the hinge pivots. Every pivot tugs the screws a fraction of a millimeter outward. Over years, that fraction adds up. The screws don't get shorter. The hole gets looser.
My neighbor Maya had the same issue in her 1990s condo. Her bathroom door started leaning inward at the top. Her landlord quoted her ninety dollars to "fix the alignment." She told me she'd try one thing first: she bought a four-pack of longer wood screws at the dollar store — three-inch ones, replacing the original one-inch screws. Each new screw reached past the soft pine and into the framing behind the door frame — not always a wall stud, but usually a thicker piece of rough framing that the trim is attached to. The longer screws gave the hinge something solid to bite into. Total cost: one dollar and twelve minutes.
When the screw is actually the problem:
- The hinge pulls away from the frame when you open the door (you can see daylight between hinge and wood)
- You can wiggle the hinge plate with your fingers
- The door has slowly drifted downward over months — top corner brushes the frame, latch doesn't catch cleanly
- You've already replaced the hinge screws once and they're loose again
If none of those describe your door, the issue is probably something else — humidity warping, a settling foundation, or a hinge that's actually bent. Don't waste time on screws for door hinges if the hinge is the real culprit.
What screws to buy, and what to skip
Tom, a friend from my building, learned the hard way that not all screws for door hinges are the same. He went to the hardware store, asked for "door hinge screws," and came home with brass wood screws. They looked right. They were the wrong metal. His door is on the exterior wall of his unit, and the humidity swings between summer and winter made the brass corrode within a year. Two of the screws snapped when he tried to remove them for a paint job. He had to drill them out and patch the frame.
Here's the short version of what actually matters when you buy screws for door hinges:
- Material: Use zinc-plated or stainless steel. Brass is decorative, not structural. Black phosphate is fine for interior doors.
- Length: The screws that come with the hinge are usually one inch. If you're replacing stripped holes, go to two-and-a-half or three inches. The extra length lets the screw reach past the soft door frame and bite into the rough framing or stud behind it. If the screw goes in and still feels loose, stop — the framing may be too far away, and you'll need to pack the hole instead.
- Head style: Phillips head is standard. If your existing screws are slotted (single groove), don't try to "upgrade" to Phillips — match what came out so the bit fits cleanly.
- Gauge: Most interior door hinges use #8 or #9 screws. If you can bring the old screw to the store, do — the wrong gauge will either spin freely or split the wood.
A four-pack of three-inch zinc wood screws costs between two and four dollars at any big-box hardware store. You don't need a specialty fastener. You need the right length, in the right metal, with a head that matches your screwdriver.
How to install screws for door hinges without stripping them again
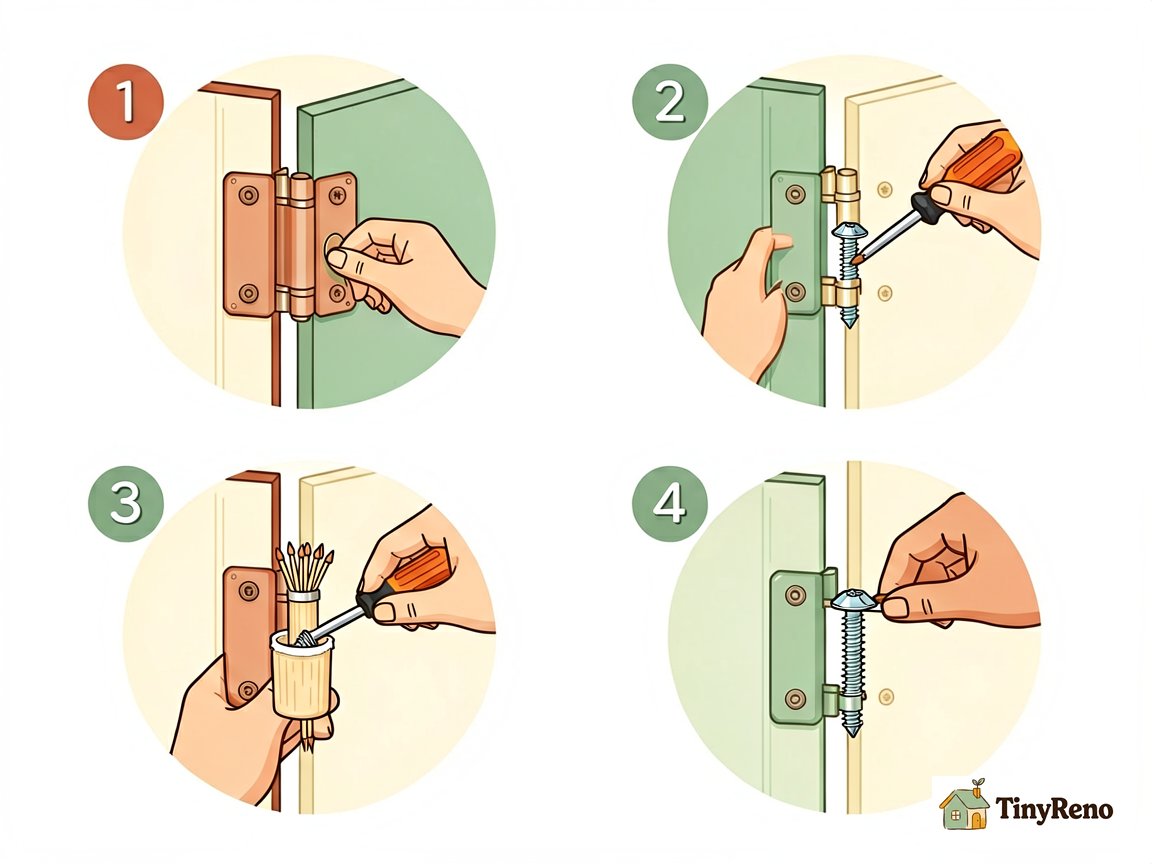
Priya, who lives in a 1970s rental with frames so soft you can dent them with a thumbnail, taught me the trick that would have saved my Saturday. Before she drove any screw, she packed the stripped hole with a wooden toothpick or two, broken off flush with the surface. The toothpicks fill the void, and when the new screw threads into them, it has something solid to bite into.
For deeper or wider holes, she uses golf tees. For very narrow holes, she cuts a sliver of wood from a paint stir stick and packs it in. None of this is pretty. All of it works.
The actual replacement takes about ninety seconds per screw once you've got the door supported:
- Open the door so the hinge is accessible. If you're replacing the top hinge, wedge something under the door to take the weight off that hinge — a stack of books works.
- Unscrew the old screw with a screwdriver that fits snugly in the head. If the head is already stripped, try a rubber band between the bit and the screw — it sometimes fills the gap enough to get a grip. If that doesn't work after two attempts, stop. A stripped screw extractor set costs $8 and takes ten minutes to use. For most renter repairs, drilling out the old screw and filling the hole is faster than fighting a stripped head.
- If the hole is stripped, pack it with toothpicks or a sliver of dowel before driving the new screw.
- Drive the new screw in slowly, with steady pressure. Stop the moment you feel resistance tighten. Don't keep going — that's how you strip the new screw.
- Repeat for each screw on each hinge. Don't replace just one screw on a hinge. If one screw has worked loose, the others on the same hinge have been carrying extra load and are probably loose too. Replace all the screws on that hinge at the same time. If the other hinges feel tight, you can leave them alone.
If you're replacing every screw on a door, expect to spend between ten and fifteen minutes total, including the time it takes to find a screwdriver that actually fits.
When screws aren't the answer (and what to do instead)
If the door frame is coming away from the wall, you'll usually see it before you feel it. A crack between the door frame and the wall, a floor gap that changes with the seasons, or a latch that slides and scrapes no matter what you do to the hinges — those are frame problems, not screw problems. Stop and call the landlord.
There's a class of door problems where screws for door hinges won't help, no matter how many toothpicks you pack. The door is sagging because the hinge is bent, because the door itself has warped from humidity, or because the frame has shifted. In those cases, you're not looking at the screws anymore — you're looking at a door problem that might need the landlord.
The simplest test: remove all the screws from one hinge and look at the wood under the plate. If the wood is solid and the screws came out tight, the problem is elsewhere. If the screws come out loose with frayed wood dust on the threads, the screws were the problem, and a longer screw or a packed hole will solve it.
If you're renting, document the issue before you fix it. A photo of a stripped hinge screw next to the hinge plate is a lot more persuasive to a landlord than "the door was sagging." Most landlords will happily cover a four-dollar screw replacement if it means avoiding a ninety-dollar service call later. If yours won't, you've still spent less than a coffee on the fix — and you keep the door working for the rest of your lease.
For renter-friendly repair guides that go beyond the door, the cabinet hinge trick uses the same packing method if your kitchen cabinets have the same problem. And if your door frame is beyond a screw fix, the door frame repair guide walks through the patching process without losing your deposit.


Discussion (0)
Sign in to join the discussion