

3 way diverter valve was a phrase I had never thought about until my roommate and I tried to share a bathtub-shower combo for the first time. The valve was stuck on shower mode. Pulling the knob did nothing. Pushing the knob did nothing. Standing in two inches of water with the shower running straight down was not the arrangement either of us had pictured when we signed the lease. That was the week I learned the 3 way diverter valve is its own part, its own repair, and its own budget line — and that the difference between a $20 fix and a $400 plumber visit is whether you can identify which of the three ways your valve is broken.
This guide is what I wish I had read at 11 pm that night, before I spent four hours taking apart the wrong end of the faucet. A 3 way diverter valve is the small plastic or metal piece inside the shower handle that routes water between the tub spout and the shower head, or — in a three-outlet setup — between two shower heads and the tub. When it fails, the symptom looks like a faucet problem, a shower head problem, or a water pressure problem, depending on which way it has failed. The valve itself is the same part regardless. The fix depends on which symptom you have.
What a 3 way diverter valve actually does (and what it doesn't)
A 3 way diverter valve is the mechanism inside the shower handle that decides where the water goes when you pull, push, or turn the knob. Three outlets means three possible paths: tub spout, fixed shower head, and handheld shower head. The two-way version routes water between two of those three — usually tub spout and shower head. The three-way version is what you have if your shower has both a fixed head and a handheld, or if you have a body spray system with multiple heads.
What the diverter does not do is control water temperature or flow. Those are separate valves — the pressure-balancing valve or thermostatic valve deeper in the wall. If your shower goes from hot to cold mid-shower, that is a different part with a different failure mode. If your shower has weak pressure overall, that is also a different problem. The 3 way diverter valve only controls direction. When it works, you pull the knob and water goes to the head. When it fails, water goes everywhere except where you wanted it.
The valve itself is a small cartridge or a pull-rod assembly mounted on the shower handle stem. On most rentals, it sits behind the handle trim, accessible by unscrewing one or two screws and pulling the handle off. The cartridge is either plastic (in older or cheaper faucets) or brass (in newer faucets). Brass cartridges last longer. Plastic cartridges fail in 5 to 10 years, which is why the symptom shows up more in older apartments.
The 3 symptoms that mean the valve, not the head
The 3 way diverter valve fails in three distinct ways. Each symptom points to the same part but tells you what kind of failure you have, which decides whether the fix is a cleaning or a replacement.
Symptom 1: water comes out of both the tub spout and the shower head at the same time. The valve is not sealing completely. Water is leaking past the diverter in the off position. This is the most common symptom and the most renter-friendly — it usually means the rubber seal on the cartridge is worn or has mineral buildup on it. Cleaning or replacing the seal fixes it 80 percent of the time.
Symptom 2: pulling the knob does nothing — water keeps coming out of the tub spout. The diverter stem is broken or disconnected. The cartridge is not moving when you pull the knob, so the water path is stuck on the default position. This is either a broken plastic stem inside the handle (a $5 part) or a disconnected link between the knob and the cartridge (a reattachment, no parts needed).
Symptom 3: pulling the knob works but water pressure to the shower head drops to a trickle. The diverter is moving but it is restricting flow. This is usually mineral buildup on the cartridge or a partially clogged inlet. The cartridge needs to come out and be cleaned or replaced. The shower head is fine. The head being replaced will not help.
A quick note: if you clean the cartridge and the pressure is still weak, the problem may not be mineral buildup — it could be a cracked internal passage or a failing seal that can't be fixed by cleaning. At that point, replacing the cartridge is the next step, not repeated cleaning. If the new cartridge doesn't restore pressure, the restriction is in the valve body or the pipes, and that's a landlord call.
All three of these are 3 way diverter valve problems. None of them are fixed by replacing the shower head, cleaning the shower head, or adjusting the water heater. Identifying which symptom you have is the only diagnostic step that matters.
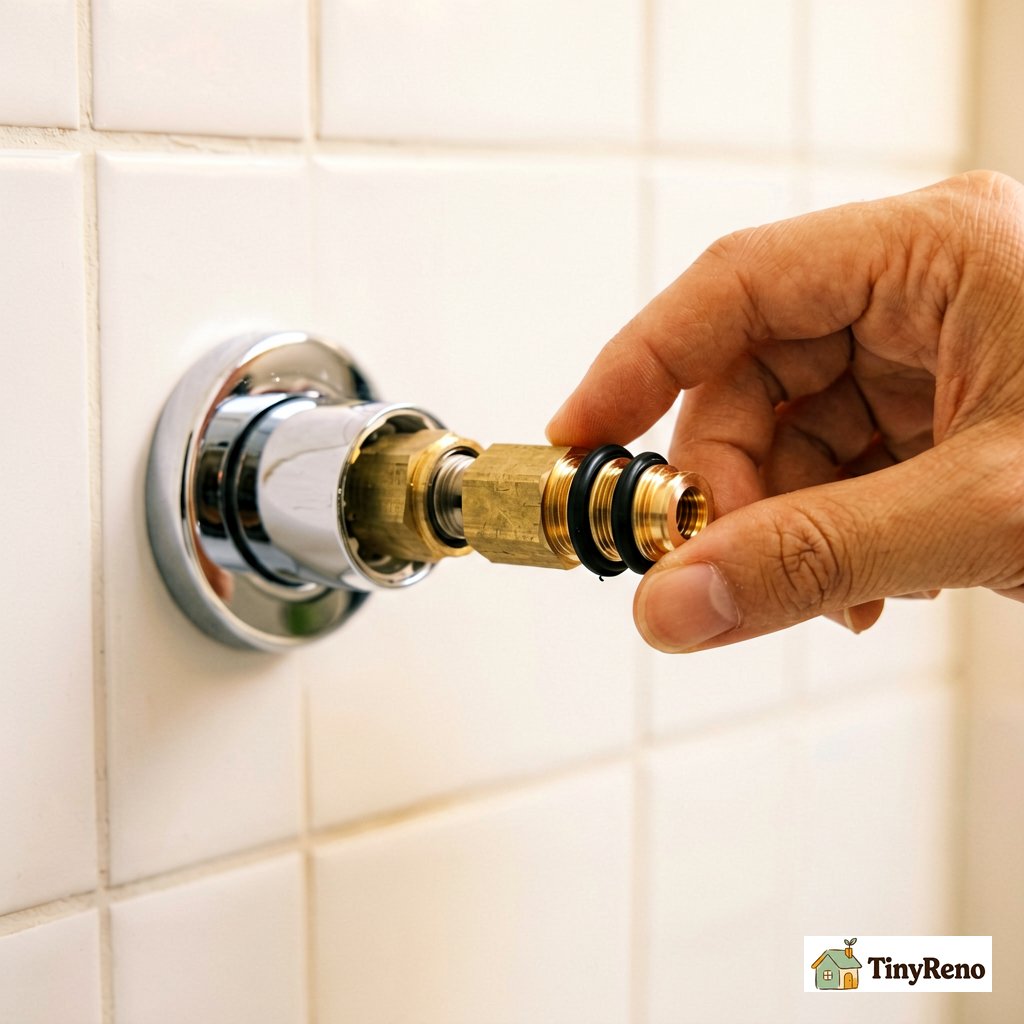
The 30-minute renter fix: clean and re-grease
For symptoms 1 and 3, the renter fix is the same: pull the valve, clean it, grease it, put it back. This is the most common repair because most 3 way diverter valve failures are mineral-related, and minerals come off with a 30-minute soak.
Before you touch anything, turn off the water to the shower. There's usually a shutoff valve behind the access panel on the other side of the shower wall, or you may need to shut off the main water supply to the apartment. If you can't find a shutoff, stop and call the landlord. Do not attempt to remove the cartridge with the water still on — the moment the cartridge comes out, water will spray out of the valve body at full pressure, and you'll have about three seconds to decide whether to try to jam it back in or run for a bucket.
Step 1: remove the handle. Locate the set screw on the handle. It is usually a small Phillips or Allen screw on the side or under a decorative cap labeled "H" or "C". Loosen it and pull the handle straight off the stem. If the handle is stuck (years of mineral buildup can fuse it to the stem), wrap it in a rag and use a handle puller — a $5 tool from the hardware store that looks like a small gear puller. Do not pry with a screwdriver. You will scratch the trim or break the stem.
Step 2: remove the trim plate. Behind the handle is a decorative trim plate (escutcheon), usually held by a plastic anchor or two screws. Pull or unscrew it. Underneath is the valve stem and the cartridge retainer nut — a large brass or chrome nut that holds the cartridge in the wall.
Step 3: remove the cartridge. Unscrew the retainer nut counterclockwise. It may be tight — use a large adjustable wrench or a strap wrench (a rubber strap that grips without scratching). Once the nut is off, pull the cartridge straight out. It is usually 4 to 6 inches long, plastic or brass, with rubber seals at each end. Some cartridges pull out easily. Some need to be wiggled. Do not force it sideways — the inlets are aligned and forcing will damage the seat.
Step 4: clean the cartridge. Soak the cartridge in a 1:1 white vinegar and water solution for 20 to 30 minutes. Use an old toothbrush to scrub the rubber seals and any visible mineral buildup. Rinse with clean water. The rubber seals should look like new rubber when done — black or white and pliable, not cracked or stiff.
Step 5: replace the seals (if needed). If the rubber seals are cracked, stiff, or visibly worn, replace them. Replacement seals come in a handful of sizes, but they're not one-size-fits-all. Take the old seal to the store and match the diameter and thickness by eye. A small kit with several sizes costs about $4, and one of them will usually fit — but only if the old seal is in your hand to compare. The new seals push on by hand.
Step 6: grease and reinstall. Apply a thin coat of plumber's grease (silicone-based, $3 a tube) to the rubber seals and the cartridge body. Plumber's grease is not the same as regular grease — it is silicone and it is rated for potable water. Do not use Vaseline or cooking oil. Push the cartridge back into the valve body, hand-tighten the retainer nut, and reinstall the trim and handle.
Step 7: test. Turn the shower on and run through all the positions. The diverter should snap cleanly between outlets. No dribble from the other outlet. No grinding or sticking when you pull the knob.
That is the entire 3 way diverter valve renter fix for symptoms 1 and 3. Thirty minutes, $10 in parts, no plumber. Symptom 2 is a different procedure.
When to stop: signs it's behind the wall
For symptom 2 — pulling the knob does nothing — the renter fix only works if the broken part is in the handle or cartridge, not in the wall. Three signs that the problem is in the wall and not renter-fixable.
You've removed the handle and the stem is intact, but when you pull the stem with pliers, nothing happens. The cartridge isn't responding. This usually means the connection between the stem and the cartridge has failed — which can be a broken plastic link or a stripped internal fitting. In some cases the cartridge itself has failed internally. Either way, once you've removed the handle and the stem doesn't move the cartridge, the next step is to replace the cartridge, not to start opening walls. If the new cartridge doesn't fix it, then you're looking at a valve body problem, and that's when you call the landlord. That link is part of the plumbing behind the tile. Renter stop.
The cartridge is corroded into the valve body. You unscrewed the retainer nut, but the cartridge will not come out. The brass threads have fused to the valve body from years of mineral exposure. Pulling harder will damage the valve seat behind the cartridge, which is part of the plumbing. Renter stop.
The handle stem is turning but the knob is spinning freely. The set screw is tight but the knob rotates without engaging the stem. The internal splines on the stem are stripped. This is replaceable as a $5 part — the stem itself is a separate piece from the cartridge and the wall plumbing. Renter fix, but a different fix than the one above.
For the two renter-stop cases, document the symptom with a photo, call the leasing office, and ask for a plumber. The repair is a cartridge replacement from inside the wall, which requires opening the tile and reseating the valve. That is a landlord expense and a landlord responsibility, the same way a behind-the-wall leak is.
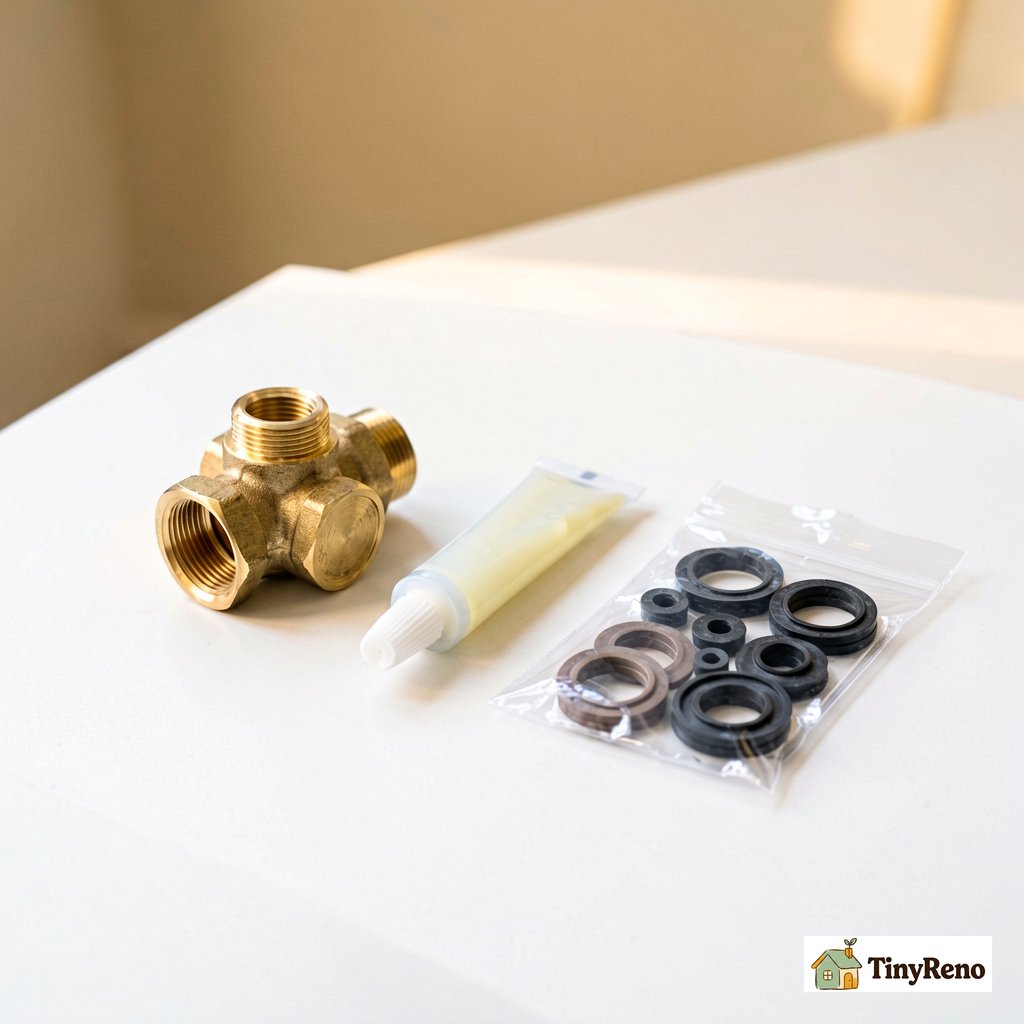
What $20 buys you at the hardware store
If the renter-clean fix does not work, or if you have symptom 2 and a stripped stem, the next step is a replacement cartridge. A universal 3 way diverter valve cartridge costs $8 to $15 at any hardware store. Bring the old one to match the length, the seal diameter, and the stem thread pattern. The five minutes at the store matching parts saves the hour of returning the wrong cartridge.
The full budget for a 3 way diverter valve renter repair, if you have to replace the cartridge instead of just cleaning it:
Replacement cartridge: $8 to $15. Plumber's grease: $3. Universal seal kit: $4. Total: $15 to $22. That is the budget that separates a renter repair from a plumber visit. A plumber doing the same cartridge replacement charges $150 to $300 for the visit plus parts. The cartridge is the same cartridge either way.
The one part of the budget that is worth spending a little more on is the grease. Silicone plumber's grease from the plumbing aisle, not the multipurpose grease from the automotive aisle. The plumbing grade is rated for the temperature and the water contact. The automotive grease will deteriorate the rubber seals within six months and you will be back at the hardware store doing the same job.
3 way diverter valve repair is usually a $20 job — in my experience, mineral buildup is the most common culprit, and it's fixable with cleaning and re-greasing. If the cartridge is cracked or the valve body is damaged, the repair is bigger and the landlord needs to be involved. But the cheapest first step — pulling the cartridge and cleaning it — is worth trying before you call anyone. The other 20 percent is a behind-the-wall problem that needs a plumber and a tile repair. The diagnostic step — figuring out which symptom you have — is the part that decides which side of the split you land on. Identifying that correctly saves you either a Saturday afternoon or a service call charge. Either way, knowing what the part is, is the first step.


Discussion (0)
Sign in to join the discussion