

Small holes in ceiling drywall, plaster, popcorn, or concrete each need a completely different fix — and buying the wrong patch kit means a second trip to the hardware store and a hole you can still see. My friend texted me a photo last week: a quarter-sized gash in her dining room ceiling. She'd just moved in, the landlord blamed the last tenant, and the hole stared back at her like an accusation.
I told her to stop before buying anything, and asked her three questions. The first was: is your ceiling drywall, plaster, popcorn, or concrete? She didn't know. Most people don't. That's the moment I realized this wasn't just about patching a hole — it was about knowing what you're patching into.
Not what color the ceiling is. Not what the landlord said. Three things about the hole itself.
Here's what those questions are, what to do based on the answers, and the two steps I skipped the first three times I patched a ceiling and ended up making things worse. If your hole turned into a wider crack, also read the 30-second wall cracks guide for the 30-second paper test — same logic applies once the patch sets.
Match Your Ceiling Type Before You Buy Anything
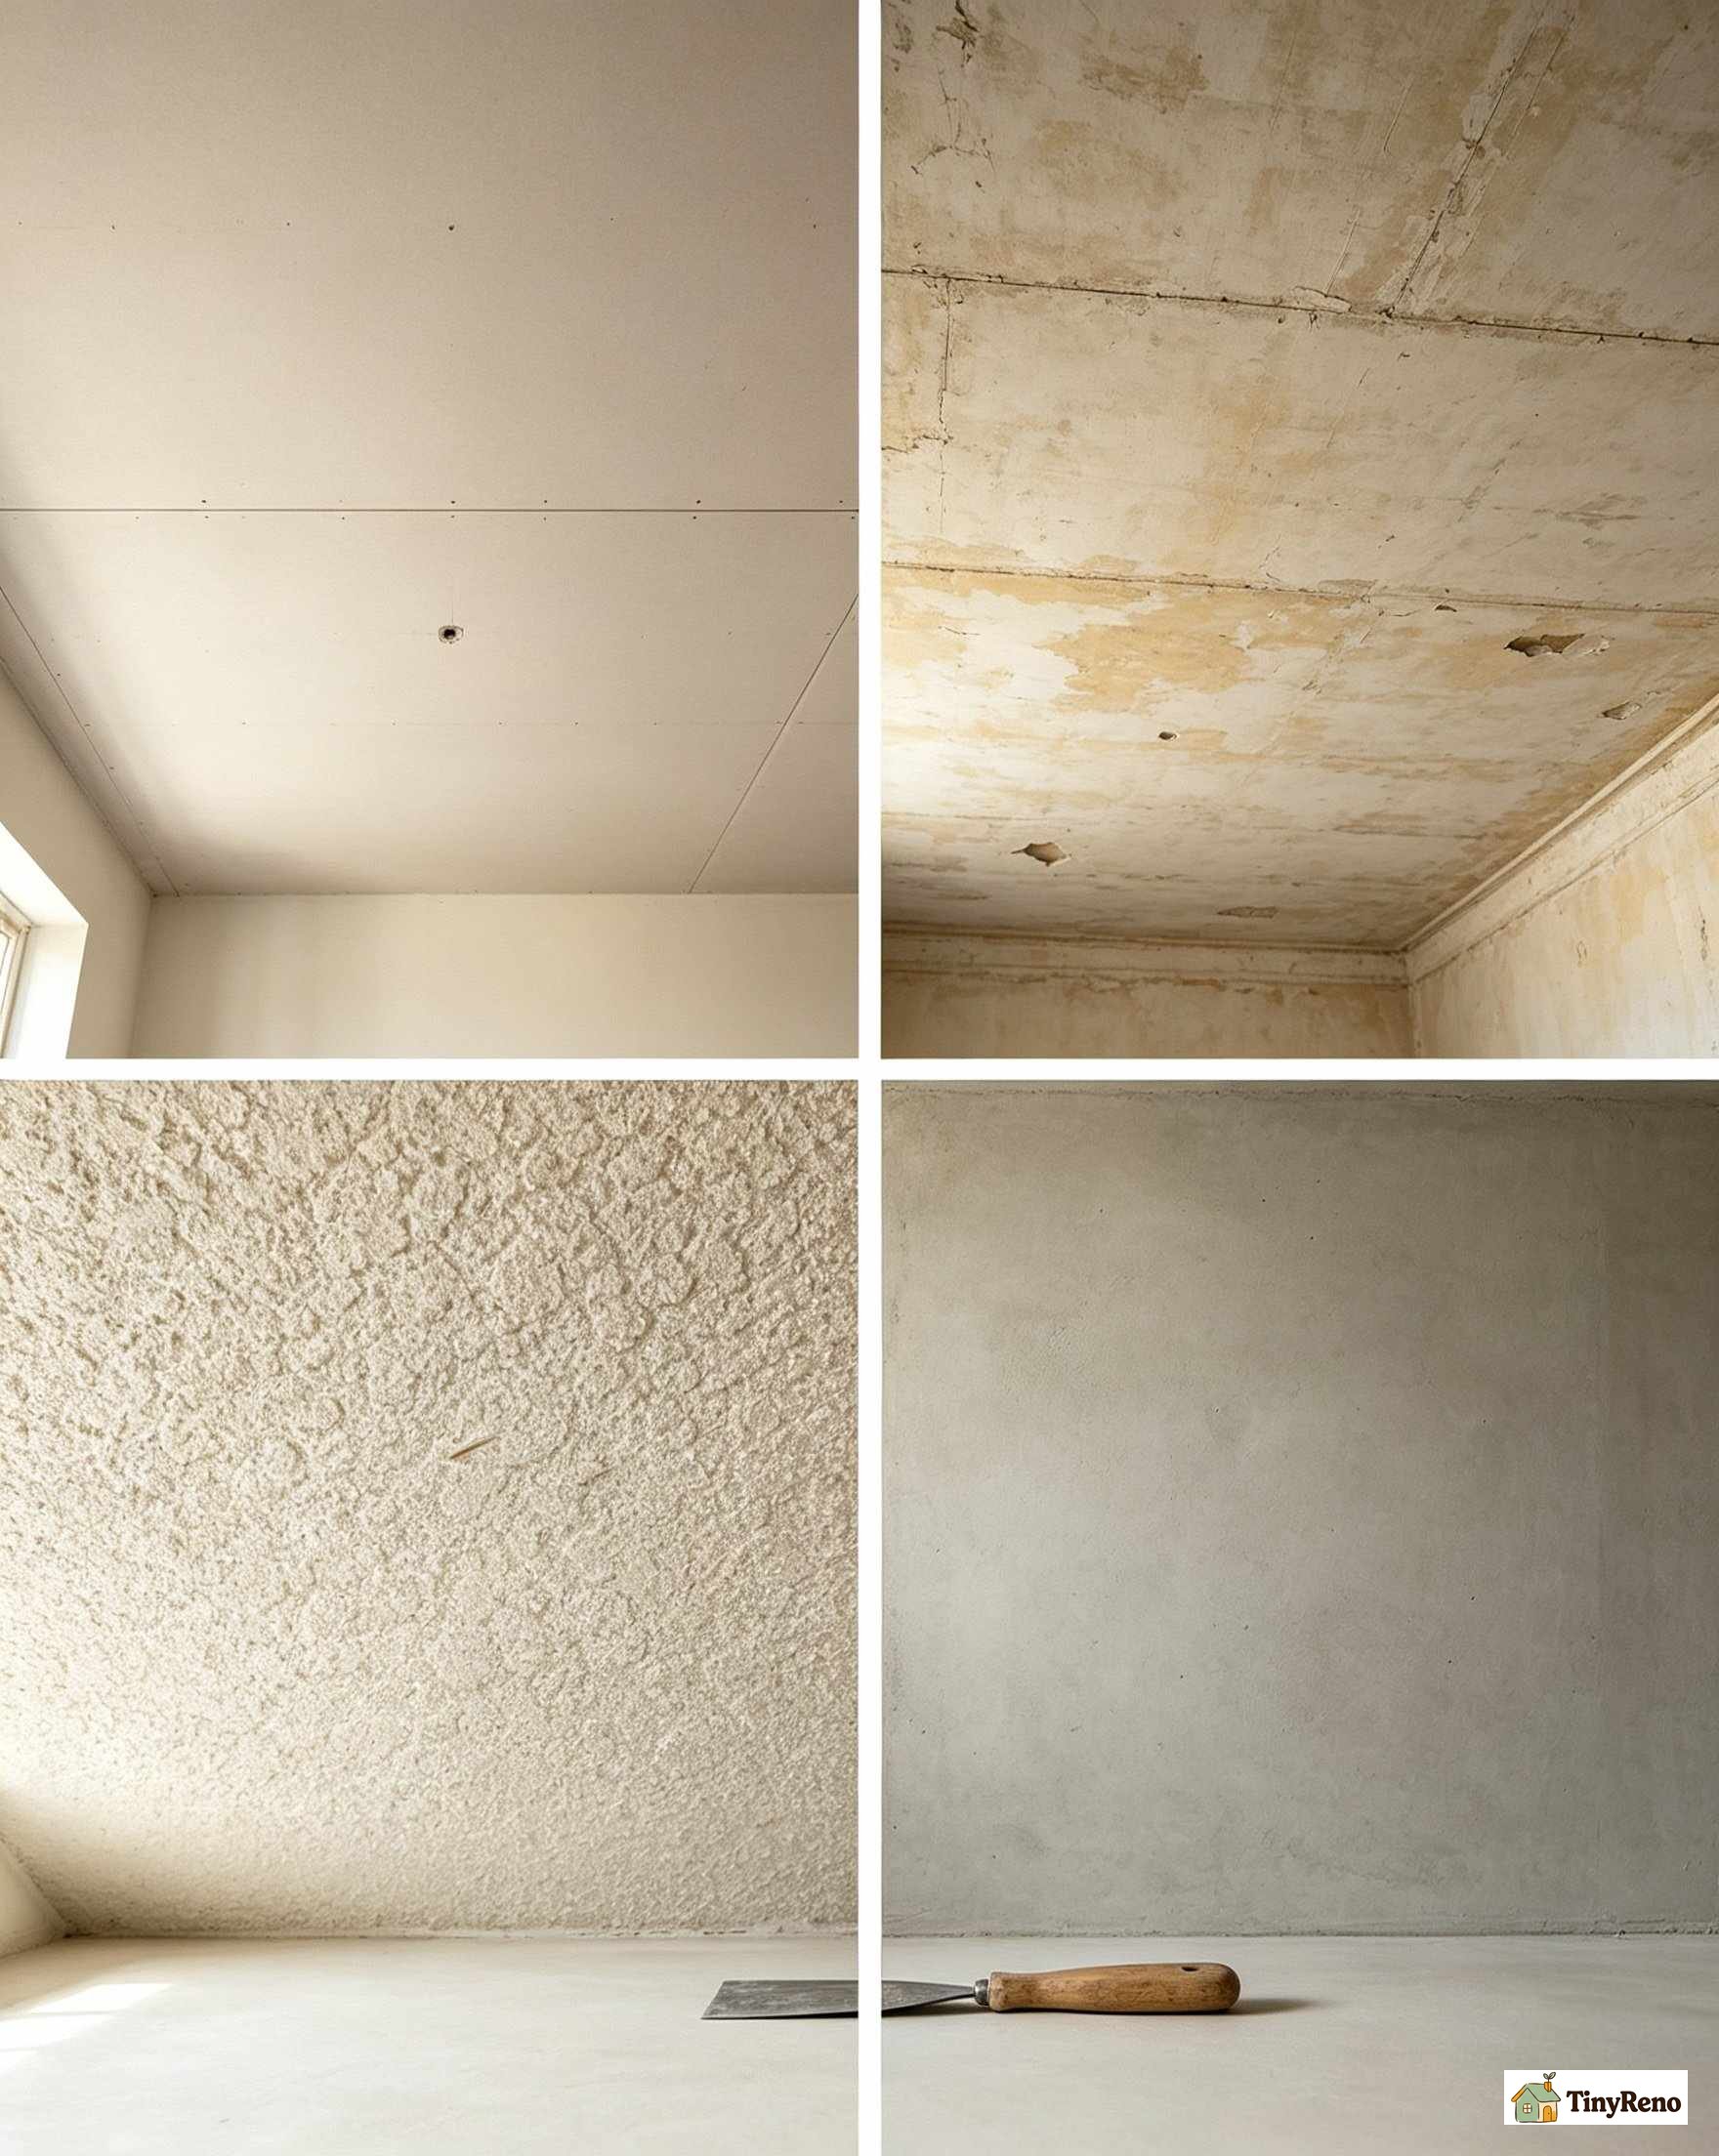
The patch kit you need depends entirely on what's above your head. Four materials show up in North American rentals, and the fix is different for each. If you buy a drywall patch kit for a plaster ceiling, it won't bond. If you buy a plaster patch kit for popcorn, it won't blend. Most small holes in ceiling repair jobs go sideways at this exact step.
- Drywall ceiling. The most common. Smooth paper-faced surface, usually 1/2" thick in rentals built after 1950. Look up and tap with your knuckle: a hollow sound means drywall. A solid thud means plaster or concrete. The surface usually reads as warm off-white or creamy ivory in older rentals.
- Plaster ceiling. Older buildings (pre-1950 mostly). Harder, denser, often has multiple coats. Tap test: solid thud. A nail driven in will hit harder resistance than drywall. Plaster ceilings often have a slightly yellowed, aged patina that newer drywall doesn't.
- Popcorn or textured ceiling. North American homes built roughly 1970-1990. The bumpy surface hides imperfections — which is great until you patch and the new texture doesn't match. The texture itself is usually painted in flat off-white or pale beige.
- Concrete ceiling. Condos, basements, ground-floor units, some loft conversions. Solid, cold to the touch. You can't drywall-patch concrete — you need a patching compound rated for masonry. Often painted over with a flat muted gray or warm white.
The 3 Hole Sizes and What Each Needs
Prep step: clean the hole. Before applying any patch, use a vacuum with a brush attachment or a damp rag to remove all dust, debris, and loose material from inside the hole. A clean hole ensures the patching compound bonds properly. Skip this and even the best patch kit will peel off in 6 months.
Once you know your ceiling type, measure the hole. A popped nail, a doorknob ding from the upstairs neighbor, or a fist-sized hole from a falling ladder all need different repair tracks. The table below pairs each hole size with the right fix for each ceiling type. Picking the wrong row is the most common reason small holes in ceiling repairs end up looking worse than the original damage.
| Hole Size | Drywall | Plaster | Popcorn | Concrete |
|---|---|---|---|---|
| Nail/screw (under 1/4") | Dab of spackle, sand, prime, paint | Dab of plaster patching compound, sand, prime, paint | Popcorn spray can after spackle sets | Vinyl concrete patch, sand, paint |
| Quarter to 2 inches | Self-adhesive drywall patch + 2 thin mud coats + sand + prime + paint | Fiberglass mesh tape + plaster patching compound (2 coats), sand, prime, paint | Patch first, then texture spray can to blend | Polymer-modified concrete patching compound (e.g., Quikrete Quick-Setting Cement) or concrete repair caulk. Apply with putty knife, let cure, sand smooth, then masonry primer + paint. Avoid hydraulic cement for small, dry holes — it's designed for active leaks and can be overkill. |
| Fist-sized (over 2") | Cut a square, screw in a backing piece, fit a new drywall patch, tape, mud 3 coats, sand, prime, paint | Same approach but use plaster-compatible patching plaster | Drywall patch first, then texture spray to blend | Call a pro — concrete patches over 2" often require specialized bonding agents and structural assessment. |
If your hole is bigger than a quarter but smaller than a fist, the small drywall patches guide walks through the self-adhesive patch method step by step. Most renters stop there and never need to cut a square.
Popcorn Ceiling Hole Repair (Don't Lose Your Mind)
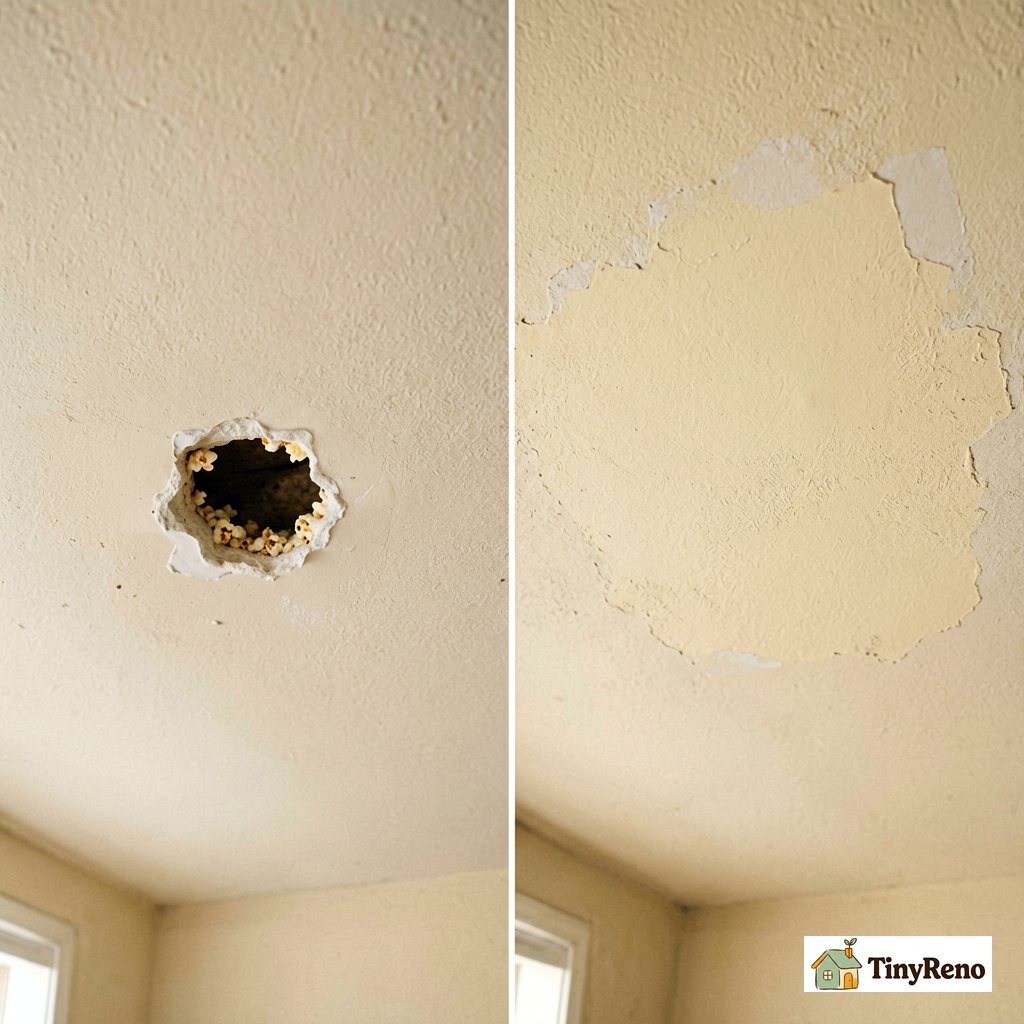
Popcorn ceilings are the worst case for matching texture. If you patch the hole cleanly but skip the texture step, the patch will look like a bald spot in a forest. Here's the workflow that actually blends.
- Before you patch, save a sample. When you move into a rental with popcorn ceilings, use a putty knife to gently scrape a small amount of texture into a ziplock bag. Label it with the apartment address and date. If you ever patch a hole, you'll have the original texture for matching. I've done this in three apartments and it saved me twice.
- Patch the hole first. Use a self-adhesive mesh patch for holes under 2", cut-and-replace for larger ones. Let the mud dry completely before the next step.
- Test spray first. Before aiming at the patch, shake the can vigorously for 60 seconds, then test-spray on a piece of cardboard or an inconspicuous corner of the ceiling. This ensures the nozzle is clear and the texture matches. Adjust your distance and spraying pressure based on the test.
- Spray the texture. A 12-ounce spray can of popcorn ceiling texture (Homax makes one, about $8) covers roughly 4-6 square feet. Hold the can 12-18 inches from the ceiling, press the nozzle, and use short bursts in a circular motion. Let it set 30 minutes before painting.
- The overnight mistake I made once. I sprayed texture at 11pm on a Tuesday and painted over it the next morning at 7am. The texture hadn't fully cured. The paint pulled up a strip of texture in the middle of the patch, leaving a visible scar. Now I wait 24 hours after spraying before priming. The wait is annoying but the result is invisible.
The first time I tried this, I oversprayed and got popcorn texture on the wall. If that happens to you, let it dry fully, then peel it off like a sticker. Don't try to wipe wet texture — you'll just smear it.
The 2 Steps I Skip Every Time (Don't Be Me)

I've patched maybe a dozen ceiling holes over the years, mostly in my own apartments. There are two steps I keep skipping the first time, then kicking myself for when things go wrong. Save yourself the repeat.
Step 1: Wear safety goggles. I dry-sanded a quarter-sized patch in my current apartment without them. A piece of dried joint compound flicked into my eye. I spent an hour at urgent care getting it flushed out. Now I wear clear safety goggles for every ceiling patch, no exceptions. Dry sanding overhead sends dust straight down into your face — gravity doesn't negotiate.
Step 2: Prime the patch before you paint. Joint compound and spackle are porous. If you paint directly over them without primer, the patch will absorb paint unevenly and you'll see a dull spot. Worse, the patch will look "different" from the surrounding ceiling even after two coats of paint. I made this mistake twice before I started priming every patch with Zinsser B-I-N. One coat of primer, then your ceiling paint. The patch disappears. The drywall mud dry time per coat matters here too — prime before the patch is fully cured and you'll seal in moisture that has to escape somewhere.
If you wet-sand instead of dry-sanding, you'll have less dust but a longer wait between coats. wet-sanding technique with a damp sponge works for patches under 4 inches and skips the goggles drama entirely. Most small holes in ceiling repairs can be done entirely wet if you size up to a damp sponge instead of sandpaper.
Wet-sanding ceiling tip: when wet-sanding overhead, wring your sponge extra thoroughly to prevent drips. Work in small sections, and keep a dry rag handy to catch any runoff. The sponge should be damp, not wet. This method significantly reduces dust but requires more frequent rinsing of the sponge.
What to Tell Your Landlord Before You Patch
In most rentals, the ceiling is the landlord's responsibility. That means you shouldn't actually patch it yourself unless they explicitly say so — even if you know how. Here's the script I use, because the wording matters.
Text or email template for your landlord: "Hi [name], there's a [size] hole in the [room] ceiling. Photo attached. It looks like it's from [your best guess: upstairs neighbor / settling / doorknob / fixture removal]. I'd like to fix it myself if that's okay with you — I have the materials and can match the existing paint. Please let me know by [date 7 days out]."
Why this wording works: you documented it with a photo (proof for your deposit return), you offered to do the work (saves them a contractor call), and you asked for explicit permission (protects you if the repair goes sideways). If they say no, ask them to handle it or offer a rent credit. Don't patch a ceiling that's not yours to patch — ceiling-vs-walls repair order and a botched DIY could cost you part of your security deposit.
One more thing on deposit returns: when I moved out of my last apartment, I took dated photos of every wall and ceiling the day I got the keys. The landlord tried to deduct $400 for "pre-existing ceiling damage" that turned out to be the hole I'd patched with his permission. The day-one photo saved me. Do this every move-in, every time. Small holes in ceiling drywall, plaster, or popcorn each take under an hour once you know the trick.
Whether you patch it yourself or the landlord calls a handyman, the goal is the same: match the ceiling type, pick the right hole-size fix, wear the goggles, prime first, document before and after. The hard part isn't the patching — it's knowing which patch to buy, and having proof later that you did the work right.


Discussion (0)
Sign in to join the discussion