

My first skim coat project was a 12x12 bedroom with orange peel texture I hated. I went in with a 4-inch putty knife I had lying around, no primer, and 4 hours of patience. The result: lumpy, cracked within 6 months, and a job I had to redo the next year. The second skim coat project (same apartment, 2 years later) took 90 minutes, used a 10-inch knife, $4 of bonding primer, and looked like new construction. Same wall, same materials, very different result. The 3 things I check before skim coating now are the 3 things I skipped the first time. Here's the checklist and the afternoon I spent getting it right.
Can You Plaster Over Drywall: The Honest Answer
You can plaster over drywall in almost every case, with three exceptions:
- The drywall has water damage or mold — plaster won't fix a structural moisture problem, and the mold will grow through the new plaster within months.
- The drywall is loose, soft, or crumbling — if you can push a finger into the drywall paper, the substrate is too weak to hold plaster. Replace the drywall first.
- The wall is bowed more than 1/4 inch out of plane — plaster won't straighten a badly bowed wall. The finish will be smooth but still curved. That requires a different fix (furring strips or replacement).
I've skim coated 3 walls total across 2 apartments. The first wall took 5 hours and looked amateur (I had to sand it twice). The second took 2 hours and looked professional. The third took 90 minutes and was good enough that a contractor friend who saw it assumed it was the original finish. The difference between the 3 wasn't the wall, the compound, or the primer — it was the knife width. 4-inch putty knife is for patching. 10-inch or 12-inch taping knife is for skim coating. This is the one thing every beginner skim coater needs to know first.
For everything else — orange peel texture you hate, visible seams, minor dents, paint roller stipple that drove you crazy for a year — a plaster skim coat is the right fix. It's the same material (joint compound) that drywall installers use to finish seams, just applied over the entire wall surface instead of just the joints.
What "plaster" actually means here: in old houses, plaster was lime or gypsum applied in multiple thick coats over wood lath. In modern drywall construction, "plastering over drywall" almost always means skim coating with all-purpose joint compound. The technique is the same, the material is easier to work with, and the result is a perfectly smooth wall ready for paint.
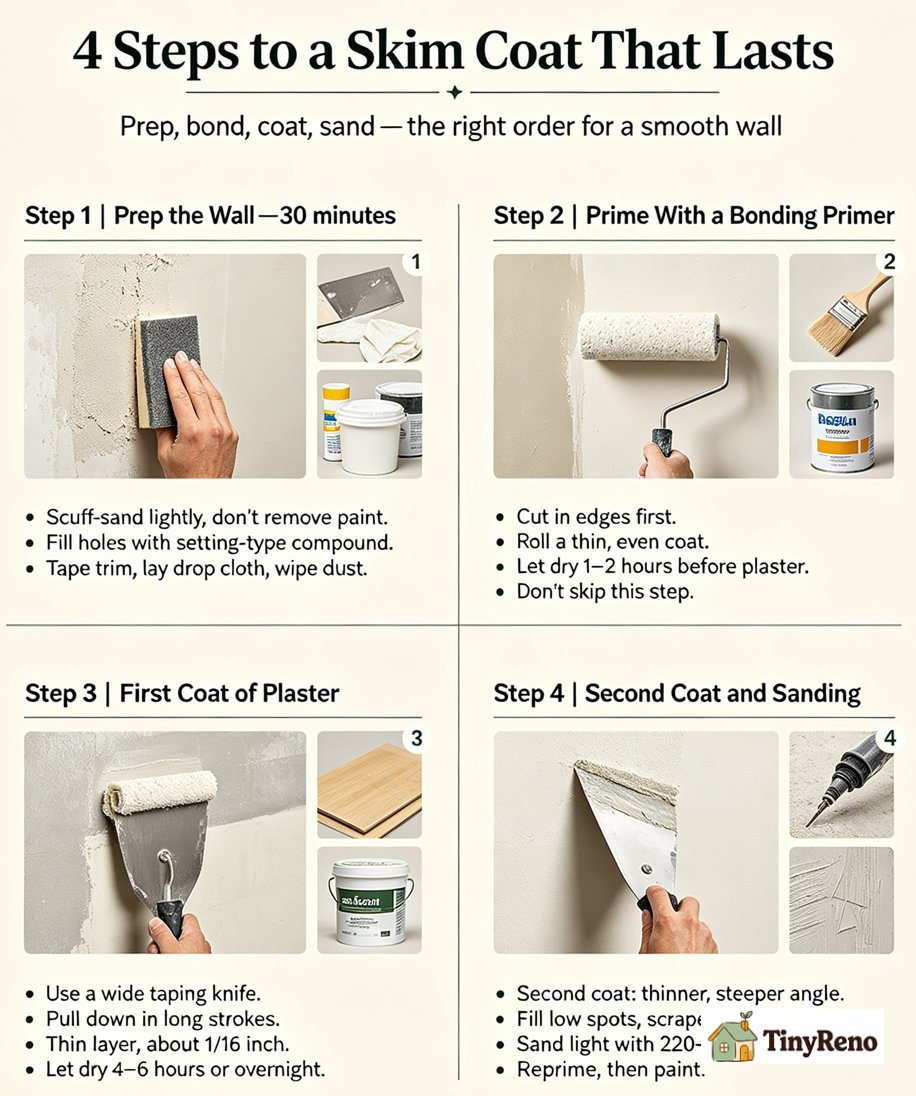
Step 1: Prep the Wall (Surface, Holes, Dust)
Prep takes about 30 minutes per average wall and is the difference between a skim coat that lasts 10 years and one that peels off in 18 months.
What you need:
- 120-grit sandpaper or sanding sponge
- Small tub of setting-type joint compound (for any holes or dings)
- Putty knife
- Damp rag
- Painter's tape (for edges and trim)
- Drop cloth
The prep: Run the sanding sponge over the entire wall with light pressure. You're not removing the existing paint or texture — you're scuffing the surface so the new compound has something to grip. Glossy paints especially need this.
Fill any nail holes, dings, or small dents with setting-type joint compound (the powder you mix, not the premixed). Setting compound is stronger than premixed and won't shrink as it dries. Let the patches cure fully (30-90 minutes depending on the formula) before moving to Step 2.
Tape off any trim, window frames, or ceiling lines you don't want to get plaster on. Lay the drop cloth to catch the inevitable drips.
Wipe the wall with a damp rag to remove all dust. The wall should be clean, scuffed, and dry before you prime.
Step 2: Prime With a Bonding Primer
This step is the one that gets skipped most often, and it's the one that causes the most skim coat failures. A bonding primer is what makes the new plaster stick to the old wall.
What you need:
- Bonding primer (KILZ Adhesion, Zinsser BIN, or equivalent)
- 9-inch roller frame with 3/8-inch nap cover
- 2.5-inch angled brush (for cutting in edges)
The prime: Cut in the edges with the brush first (where the wall meets the ceiling, trim, and corners). Then roll the bonding primer over the entire wall in a thin, even coat. Don't try to get full coverage on the first pass — you're just creating a substrate the plaster can bond to.
Let the primer dry per the can (usually 1-2 hours). The wall will look slightly different than before — usually with a subtle sheen. That's the bonding primer doing its job.
Skip this step and the plaster over drywall will fail. The paint or texture underneath the new plaster will release within months, taking the new plaster with it. The 10 minutes of priming is the single best insurance against a failed skim coat.
Step 3: First Coat of Plaster (Skim Coat)
This is the step that intimidates people the most, but it's actually the easiest once you get the technique down. The first coat is thin and forgiving — it's not supposed to be perfect.
What you need:
- Premixed all-purpose joint compound (a gallon is enough for one average wall)
- Plaster hawk (or a flat piece of plywood as a stand-in)
- 10-inch or 12-inch taping knife (NOT a putty knife — the wide one is essential)
- 6-inch taping knife (for loading the hawk and cleanup)
The first coat: Scoop about 1/2 cup of joint compound onto the hawk using the 6-inch knife. Then scoop a small amount onto the edge of the 10-inch knife with the 6-inch knife. Hold the 10-inch knife at about 30 degrees to the wall, with the compound on the back edge of the knife (away from you).
Starting at the top of the wall, pull the knife down in a long, smooth stroke, pressing firmly enough to spread the compound into a thin layer (about 1/16 inch thick) but not so hard that you scrape the wall clean. Each stroke should overlap the previous one by about 30%.
Work in sections about 2 feet wide. The first coat doesn't need to be smooth — just even. You'll have trowel marks, ridges, and thin spots. That's all normal. The second coat fixes those.
Let the first coat dry completely — usually 4-6 hours, or overnight if you have the time. The compound will turn from dark gray to light gray/white as it dries.
Step 4: Second Coat and Sanding
The second coat is what creates the smooth, professional finish. It's thinner than the first coat and uses a different technique — the knife should almost float across the surface.
The second coat: Using the same 10-inch knife, scoop a small amount of fresh joint compound (you can use leftover from the first coat or a fresh tub). Apply a much thinner layer this time — almost a film, with the knife held at a steeper angle (closer to 45 degrees) and using only the weight of the knife to spread.
Work the second coat in long, sweeping strokes that go in multiple directions. The idea is to fill in the low spots from the first coat while scraping off the high spots. The result should look like a smooth, slightly damp wall with very few visible trowel marks.
Let the second coat dry 4-6 hours or overnight.
The sand: Use a 220-grit sanding sponge with very light pressure. Hold a bright flashlight parallel to the wall to find any remaining ridges or low spots. The goal is "smooth to the touch" — not "perfectly flat," because a perfectly flat wall is impossible and the eye can't detect the difference anyway. Wipe the wall with a damp rag to remove all dust.
Prime the patched area again (a thin coat of standard drywall primer), let dry, then paint with your wall color. The second prime is what makes the new plaster absorb paint the same way as the surrounding wall. The final result looks like a brand new plaster over drywall surface — smooth, even, and ready for any paint finish you want to apply.
When to Skip This and Call a Pro
Three situations where plastering over drywall goes beyond renter scope:
- The wall has heavy orange peel or knockdown texture — a skim coat will cover it, but you'll need three coats instead of two, and the material cost goes up to $50-70 per wall. At that point, hiring a plasterer to do it in one pass is often cheaper than the materials for DIY.
- The walls are bowed or out of plumb by more than 1/4 inch — plaster doesn't straighten walls. You need to address the underlying framing first.
- You're trying to cover water stains or active moisture — find and fix the leak first, then plaster. Plastering over a wet wall just traps the moisture and creates a mold problem.
For everything else — the orange peel texture, the visible seams, the bad paint job, the wall that just looks tired — the 4-step skim coat above is the right renter fix. It costs under $30 in materials per wall, takes a weekend, and lasts the entire lease. The landlord usually has no idea the wall was ever textured because the finish looks like new construction.
The technique gets easier with practice. My first skim coat took 5 hours for one wall and had visible trowel marks I had to sand out. My third skim coat took 90 minutes and was smooth enough to skip most of the sanding. If you're not sure how it'll turn out, practice on a closet wall first — no one sees a closet wall, and the practice makes the visible walls turn out better.
What it actually costs to mud and tape drywall covers the labor and material math for full-room skim coating if your project is bigger than a single wall.
Settlement cracks in drywall repair guide covers the related fix for cracks that show up after the skim coat — same toolkit, different cause.


Discussion (0)
Sign in to join the discussion