

My mom texted me a photo last spring. The bathroom exhaust fan cover in her rental was missing entirely. The landlord had not sent anyone to fix it in three weeks. During those three weeks, the bathroom fan pulled air straight from the open ceiling hole, including dust from the attic above, and made a sound like a small jet engine because the cover that should have redirected the airflow was gone.
When the landlord's handyman finally showed up, my mom watched him do the whole job in five minutes with nothing in his hands. He reached into his van, pulled out a plastic grille, walked up a step stool, and snapped it into place. No screws. No tools. No swearing at the ceiling.
Seeing how effortless the repair really was inspired me to put together a complete guide to bathroom exhaust fan cover replacement. Here is what I learned from watching that. Most covers, also called fan grilles, since 2010 use two spring clips and take about five minutes. The single biggest trap is measuring the cover instead of the opening.
When My Mom's Bathroom Fan Cover Went Missing
Three weeks of running the bathroom fan without a cover meant three weeks of dust falling from the attic, three weeks of a louder fan than necessary, and three weeks of cold attic air trickling into the bathroom whenever the fan was off.
This is a habitability issue in most jurisdictions, and my mom should have escalated earlier. Most renters do not realize a missing bathroom exhaust fan cover counts as a habitability problem.
If your cover is broken or missing, document the problem with a photo and date, send it to your landlord in writing, and ask for a specific timeline. If the landlord does not act within a week, escalate. Your local housing code or tenant union can write a letter on your behalf.
Once the landlord sends someone, the fix is genuinely a five minute job. My mom watched the handyman do it. He did not even need a screwdriver.
Why a Missing Exhaust Fan Cover Creates Household Problems
The grille on a bathroom exhaust fan is not just a decorative plate. It does three jobs that matter.
First, it directs the airflow from the fan outward into the room instead of letting the suction pull air back through the duct. Without a cover, the fan is fighting itself, which is why the missing-cover case sounds louder than a working one. The cover also reduces the perceived noise level by breaking up the air column.
Second, it acts as a basic filter. Most covers have a small foam or mesh insert that catches lint and dust before it gets sucked into the motor. A clogged cover makes the fan work harder, runs hotter, and shortens the life of the motor. Replacing a ten dollar cover every two years is much cheaper than replacing a hundred dollar fan.
Third, the backflow damper behind most covers is what stops outside air from coming back in when the fan is off. Without it, your bathroom gets a slow trickle of cold attic air in winter and humid outdoor air in summer. In cold climates, that backdraft is the difference between a bathroom that heats up in five minutes and one that never quite does.
What Happened at My Neighbor's Place Last Month
My neighbor across the hall had the opposite problem. His bathroom exhaust fan cover was not missing. It had yellowed badly over ten years of use, to the point where the cover was darker than the ceiling around it and looked like a stain from below.
He asked me how to replace a bathroom exhaust fan cover without bothering his landlord. The answer was the same as my mom's situation: a like-for-like cover swap is one of the few maintenance tasks that is reasonable for a renter to do without explicit landlord permission, as long as no electrical or ceiling modification is involved. He ordered a four-pack of white plastic covers online for fifteen dollars, pulled the old one down, and snapped a new one in. Total time, five minutes.
The old cover went in the trash. The new one matched the ceiling color and made his bathroom look ten years younger. He did not tell his landlord because there was nothing to tell. The new cover was identical to the old one in function and appearance. If the landlord had been paying attention, he would not have noticed the difference.
The Five Minute Job
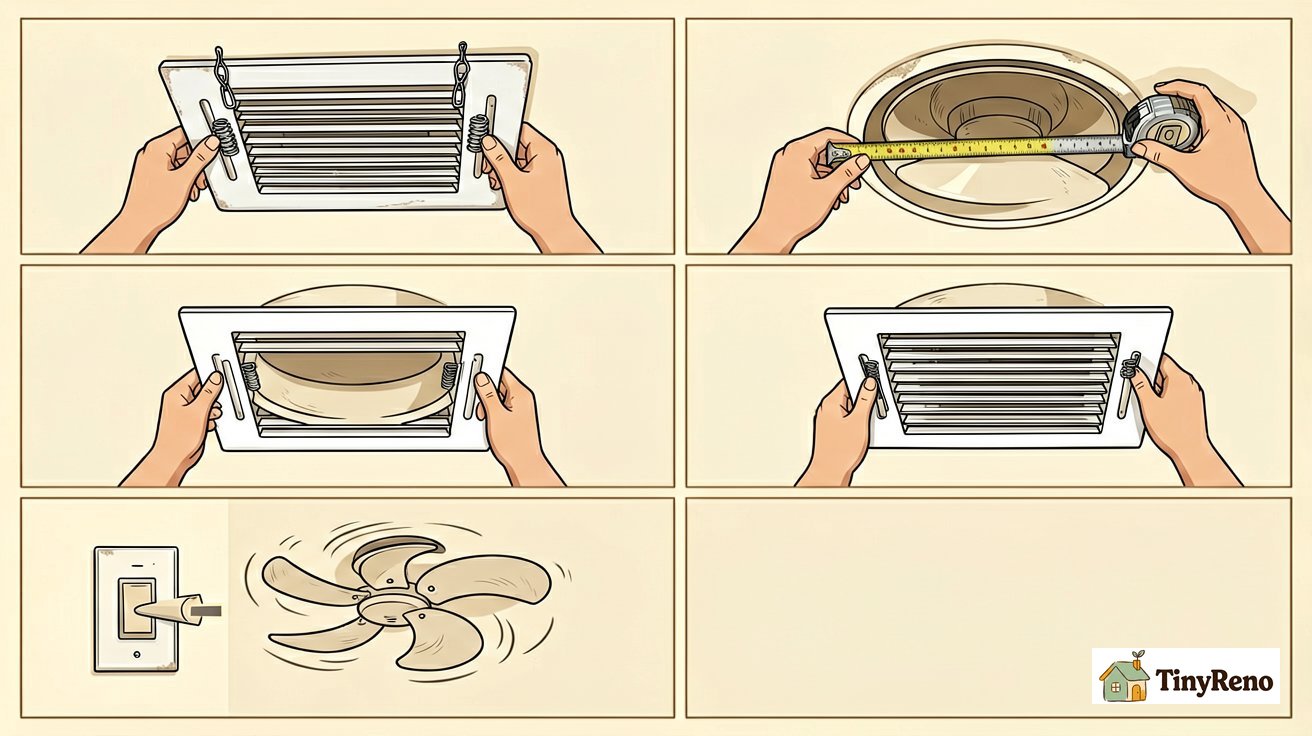
Step 1: Pull the Old Cover Off
Most modern bathroom exhaust fan covers are held in place by two metal spring clips on either side. Grasp the cover firmly with both hands and pull straight down. The springs will compress and the cover will drop into your hands. Some older models twist off instead of pulling down, but pulling down works for at least 80 percent of fans in rentals.
If the cover does not move, do not pry it. There may be a small release tab or screw on the side. Most fans built after 2010 use the spring-clip style. If yours does not, check the model number on the side of the housing and look up the manual online before doing anything.
If the cover has been painted over, the paint seal can glue the cover to the ceiling. Run a utility knife around the edge of the cover before pulling down. The blade breaks the paint seal and lets the springs move freely.
Step 2: Measure the Opening
The single most common mistake people make when buying a replacement bathroom exhaust fan cover is measuring the cover instead of the opening. The cover is always a little larger than the hole it covers, because the springs need somewhere to grip.
What you need is two numbers: the width and the length of the rectangular or square opening in the ceiling where the fan housing sits. Most bathroom exhaust fans have openings that measure either 7.5 by 7.5 inches or 8 by 8 inches. A few odd models use 9 by 9 or non-square sizes. Measure both dimensions to the nearest quarter inch.
If your ceiling uses the metric integrated panel system common in newer construction, the standard ceiling panel is 300 by 600 millimeters, which is roughly 11.8 by 23.6 inches. Covers for these panels are sold as 300 by 600 mm replacements.
Also measure the diameter of the duct connection visible inside the housing, in case you ever need a transition piece. Common duct sizes are 3, 4, and 6 inches. You will not need this number for the cover itself, but it is worth writing down for future reference.
Step 3: Match the Size to the Cover
The replacement bathroom exhaust fan cover you buy should be slightly larger than your opening, not the same size. Standard replacement covers come in sizes that match standard openings, with the springs sized to grip the housing edge. A cover labeled 7.75 by 7.75 inches is designed to fit a 7.5 by 7.5 inch opening. A cover labeled 8 by 8 fits an 8 by 8 opening.
If you cannot find an exact size match, buy the next size down rather than up. A cover that is slightly too small will still snap in but will leave a visible gap at the edge. A cover that is too large will not engage the springs at all.
Step 4: Snap the New Cover Into Place
Hold the new cover up to the opening with both hands. Align the spring clips so they face the inside edges of the housing. Push the cover up firmly until you hear the springs engage on both sides. The cover should sit flush against the ceiling with no visible gap.
If the cover feels loose after snapping in, one of the springs may not have caught. Push up again on the loose side, listening for the click. A properly seated cover will not move when you pull down gently on it.
Step 5: Test the Fan
Turn on the fan and let it run for thirty seconds. The sound should drop noticeably compared to running without a cover. If the sound actually got louder, the cover may be partially blocking the fan blade. Remove the cover and check that nothing inside the housing shifted during the swap. Most covers have an arrow or notch that indicates the correct orientation. Reversing the cover can cut airflow by a third.
Choosing the Right Replacement Cover
Three things to consider when picking a cover.
Material
Plastic covers are the standard. They are light, easy to clean, and come in white or off-white to match most ceilings. Plastic covers yellow with age, especially in bathrooms with strong lighting or smokers. White-painted steel covers resist yellowing and last longer, but they cost a few dollars more and the paint can chip if you pull the cover down too hard.
For most renters, plastic is fine. My mom ended up with a plastic cover and has not thought about it since.
Size and Shape
Round covers exist for round fan housings. Square covers exist for square housings. Within each category, the dimensions need to match. If your housing is round, you need a round cover. Trying to fit a square cover over a round opening leaves visible gaps and the springs will not seat properly.
For an integrated drop ceiling with a 300 by 600 mm aluminum panel, the cover matches the ceiling panel dimensions, which is roughly 11.8 by 23.6 inches. These covers drop into the panel slot in place of the standard ceiling tile.
Light or No Light
Some covers include a small LED light in the center. These add a soft night light or a low-level reading light to the bathroom. If your existing fan does not have wiring for a light, the LED version will not work. If you are buying a cover for a fan that already has a light kit installed, the light version can replace a burned-out bulb without rewiring.
For my mom's rental, a plain cover with no light was the right call. The bathroom already had a separate overhead light. For my neighbor across the hall, the LED version would have been a nice upgrade, but he did not have the wiring for it.
What Costs What
Replacement bathroom exhaust fan covers run from five dollars for the most basic plastic model to twenty-five dollars for a designer cover with a built-in LED. Most renters do not need anything fancier than the basic plastic cover in white. The brand does not matter as long as the size matches. The hardware is generic across all major manufacturers.
If you want to replace a bathroom exhaust fan cover with a filter-equipped model, expect to spend closer to fifteen dollars. These covers include a small foam or mesh pad that you rinse and reuse every few months. The filter cuts down on dust buildup in the fan motor and improves air quality during fan operation.
My neighbor bought a four-pack online for fifteen dollars. One for his bathroom, three spares in case the next one yellows in five years instead of ten.
What to Do If the Old Cover Is Stuck
A few situations where pulling the cover is not a one-step job.
If the cover has been painted over, the paint seal can glue the cover to the ceiling. Run a utility knife around the edge of the cover before pulling down. The blade breaks the paint seal and lets the springs move freely.
If the springs themselves are bent from years of removal and reinstallation, they may not compress cleanly. A gentle squeeze with pliers can reshape a spring back to its original curve. If the spring is broken, replace the cover rather than the spring. Springs are not sold separately for most consumer fan models.
If the housing is the wrong size for any cover you can find, the fan itself may be a non-standard model from the 1980s or 1990s. In that case, replacing the entire fan unit is usually cheaper than trying to source a custom cover.


Discussion (0)
Sign in to join the discussion