

My friend Jen texted me a photo of her dead bathroom exhaust fan last winter. She wanted to know how to change a bathroom exhaust fan herself. The motor had started making a sound like a coffee grinder full of rocks, then stopped entirely. Her landlord was unreachable. Her contractor quoted $280 for a half-day visit plus parts. She asked if she could replace the unit herself.
Many homeowners face this exact dilemma and search for clear instructions how to replace exhaust fan in the bathroom without electrical errors or expensive professional fees.
A note before the steps: most leases prohibit residents from doing electrical work on the rental property. If you rent, keep reading so you understand what your contractor is doing. The actual work belongs to the homeowner or a licensed electrician.
Why Jen Almost Paid $280 for a 40 Minute Job
Jen had never thought about her bathroom exhaust fan until it failed. Most homeowners do not think about replacing the bathroom exhaust fan until the bearings go, by which point a full replacement is the only fix. Her contractor quoted $280. The actual parts cost about $90, and two people with a voltage tester can do it in forty minutes. If you rent, do not do this job yourself, but read the steps so you can push back if your contractor overcharges or skips steps.
The Two Mistakes We Made
These are the two issues we hit. Skip ahead if you just want the steps, but come back to this section if something goes wrong on your install.
Mistake 1: We Did Not Match the Duct Size
The old fan housing was 4 inches in diameter at the duct connection. The new fan we bought online had a 3 inch duct outlet. We forced the reducer on and ran the fan for two minutes to test. Airflow dropped by a third and the motor sounded like it was working twice as hard. We caught it because the reducer felt wrong going on. If we had not noticed, the motor would have burned out in a month from back pressure.
The fix was returning the unit and buying the right size. Before you buy, measure the diameter of the duct pipe at the existing ceiling hole. Common sizes are 3, 4, and 6 inches. Match the new fan's outlet to your duct, not the housing dimensions.
Mistake 2: We Connected the Live Wire to the Wrong Terminal
Most bathroom exhaust fans have three wires going into the motor housing: black (live), white (neutral), and green or bare (ground). On the unit we bought, the terminals were labeled but the label was a small sticker that fell off the moment we opened the box. We guessed at the wiring and connected black to the terminal closest to the fan blade. The fan ran but reversed direction briefly during startup, which can overheat the motor over time.
The right move was to take a phone photo of the terminal layout before removing the old unit, or to check the wiring diagram in the box. If your new unit has a removable terminal block, label the wires by color before disconnecting.
What You Need
The full tool list is short:
- Voltage tester (non-contact is fine, ten to twenty dollars) - Phillips and flathead screwdrivers - Wire stripper or a sharp knife - Wire nuts (usually included with the new unit) - Electrical tape - Step stool or small ladder - Phone or camera for documenting wiring
The new unit itself. Bring the model number of the old one or, better, the diameter of the existing duct and the rough-in size of the ceiling hole. Standard rough-in sizes are 7.5 by 7.5 inches or 8 by 8 inches.
For an integrated ceiling install, also check the ceiling panel size. Standard aluminum drop ceiling panels are 300 by 600 millimeters, which is roughly 11.8 by 23.6 inches. If your new unit is sized for a 300 by 600 ceiling panel, the install is significantly easier than if you need to cut a custom opening.
If only your fan’s outer grille is damaged and the motor works fine, simple bathroom exhaust fan cover replacement takes 5 minutes with zero electrical work.
The Actual Steps
Step 1: Kill the Power
Go to the breaker panel and turn off the breaker labeled bathroom or, if the labeling is unclear, the breaker for the entire bathroom. Flip the wall switch on and off to confirm the fan is dead. Then touch the non-contact voltage tester to the wires at the fan housing. No beep or light means the power is truly off. Do this even if you flipped the breaker. Breakers get mislabeled. Old homes sometimes have split circuits where one switch controls the light and a different switch controls the fan.
Step 2: Remove the Old Grille and Motor
The grille usually pulls straight down with gentle pressure. Two spring clips on either side hold it. Once the grille is off, you will see the motor assembly hanging by a couple of wires or sitting on a mounting bracket. Most units let you squeeze a release tab or undo two screws to drop the motor down for service. Let it hang by its wires or support it with one hand while you disconnect.
Step 3: Document the Wiring
Before touching anything, take three photos: the wire terminals, the inside of the housing, and any labels or stickers on the motor. These are your reference if the new unit's wiring diagram is unclear or goes missing. Jen and I both took photos from two angles, which turned out to be useful when the new unit's wiring diagram did not match the old one exactly.
Step 4: Disconnect the Wires
Standard residential wiring in this category is black, white, and green or bare. Unscrew the wire nuts and pull the wires apart. If the wires look corroded or the insulation is cracking, cut back half an inch and strip fresh copper. Do not just reconnect old corroded copper to a new motor.
Step 5: Remove the Old Housing
The metal housing is usually held to the ceiling joists by two or four screws or by spring clips. Remove the screws, then gently pull the housing down. If it sticks, do not force it. There may be a hidden clip or the housing may have been foamed in place. A gentle pry with a flathead screwdriver usually frees it.
If the previous installer sealed the edges with expanding foam, the housing will be harder to remove. Cut it away with a utility knife before pulling.
Step 6: Set the New Housing in Place
Slide the new housing up into the ceiling opening and seat it against the joists. If your new housing is a different rough-in size than the old one, you will need a transition frame. Most home improvement stores sell these for under twenty dollars. Secure the housing to the joists with the included screws or the screws you removed from the old one.
Step 7: Connect the Duct
Match the duct reducer if needed. The duct should slide over the housing outlet and be secured with aluminum tape or a hose clamp. Do not use regular duct tape. Regular duct tape adhesive fails in moist bathroom air within a year, and a detached duct leaks warm humid air into your attic where it causes mold you cannot see.
A backflow damper inside the duct connection is worth checking while you have the duct open. A damper is a small flap that closes when the fan is off. Without a damper, outside air comes back through the vent pipe. In cold climates, that means cold attic air trickling into the bathroom. In climates with birds or rodents, that means critters. One buyer I read about found a bird nest in his duct when he finally opened the cover to clean it. The damper would have prevented it.
Step 8: Wire the New Motor
Hang the new motor from the housing bracket. Match the wires by color. Black to black, white to white, green or bare to the ground screw on the housing. Twist on the wire nuts and wrap each with electrical tape for extra security. Gently push the wired connections back into the housing.
Step 9: Snap the New Grille On
The new grille usually clips into the housing the same way the old one did. Push up until you hear the spring clips engage. If your new grille is different from the old one, the clips may be at a slightly different angle. A quick test is to push up on one corner first to make sure that clip engages, then push up on the opposite corner.
Step 10: Restore Power and Test
Flip the breaker back on. Turn on the wall switch. The fan should start immediately at low speed. Listen for unusual sounds, especially grinding or bearing noise. Run it for five minutes, then check the housing for heat. The motor will be warm but not hot. If the housing is too hot to touch, you have a wiring problem and need to kill the power and recheck.
Jen and I ran hers for ten minutes. The motor was warm, the airflow felt right, and the noise was noticeably quieter than the old unit. Her only follow-up a week later was that the new fan pulls so much air that the door now needs to be cracked during a shower or the vacuum effect pulls the shower curtain inward. That is a problem you want to have.
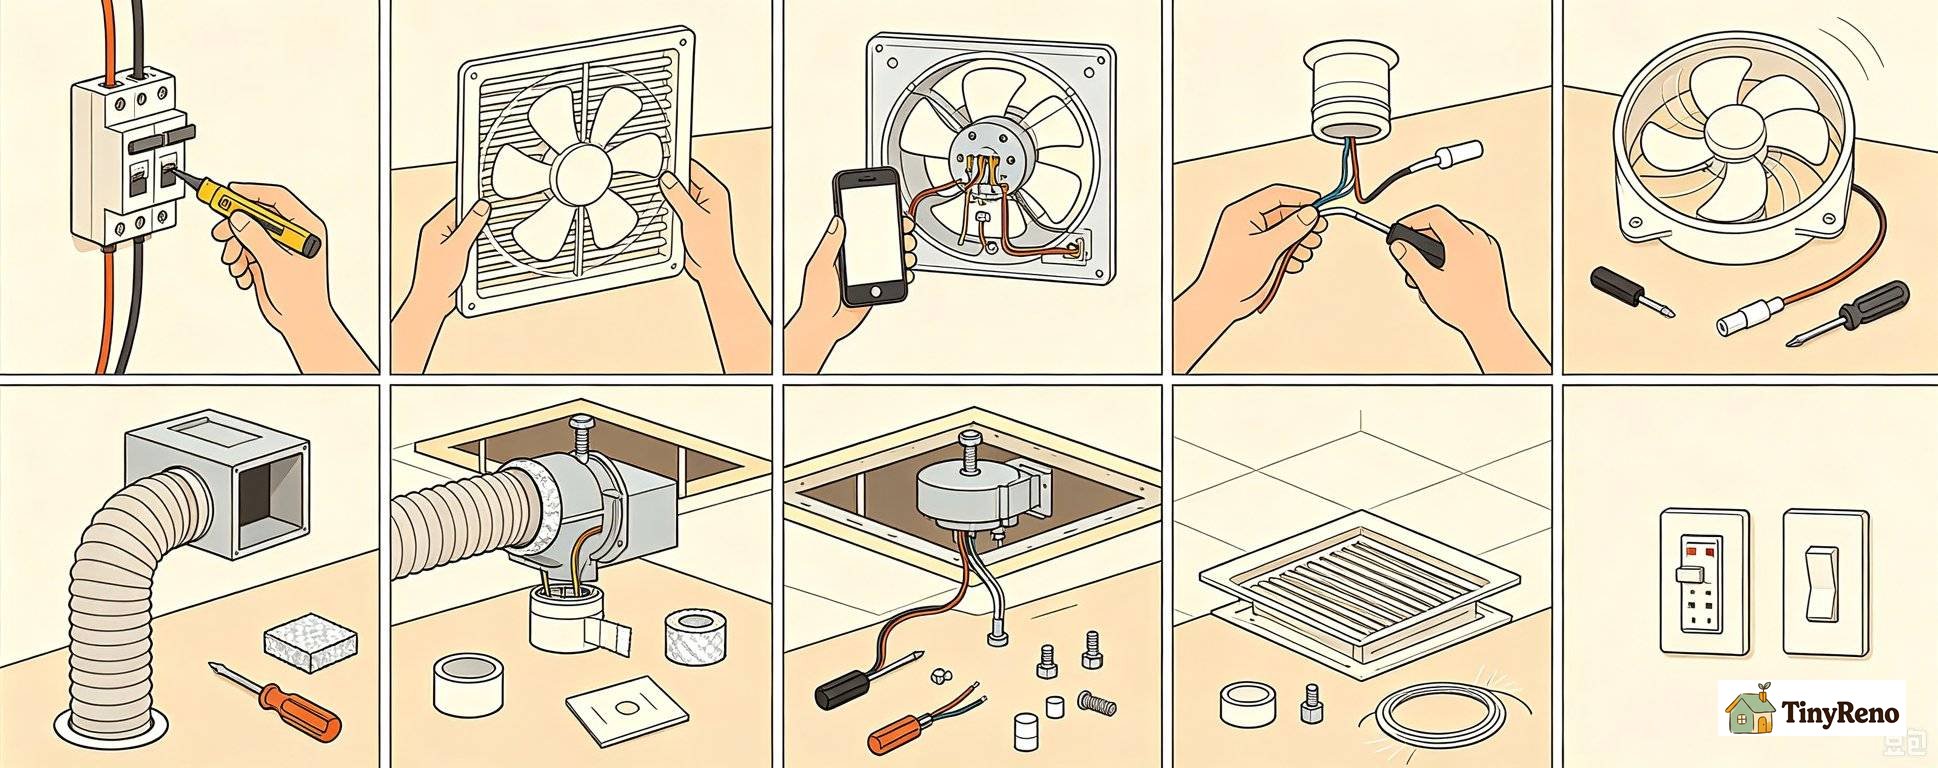
What Most Guides Skip
A few things the standard tutorials leave out.
Control Type Matters More Than Specs
When you buy a new unit, you also pick a control type: mechanical button, touch panel, wireless remote, or voice control. Mechanical buttons are the cheapest and the most reliable, but they require new wiring in most cases. Touch panels look modern but the buttons can be hard to find in the dark. Wireless remotes stick to the wall with adhesive, which means no electrical wiring to run, and the remote can sit anywhere within range. Voice control units work with the major smart home platforms, which is genuinely useful if you already have one.
For Jen, who is renting, the wireless remote was the obvious choice. The remote stuck to the wall next to the door with a Command strip. When she moves out, she pulls the strip off and the apartment is back to its original state. That kind of reversibility matters when you rent.
Motor Count Decides Your Noise Tolerance
If the bathroom is next to a bedroom, the motor count matters more than any other spec. Single-motor units run 50 to 55 sones at full speed. Dual-motor units run 35 to 42 sones, which is a soft hum. Triple-motor units run 28 to 35 sones, which is near silent.
Jen went from a single-motor old unit to a dual-motor new one. The noise drop was the single biggest improvement she noticed, more than the heating or the lighting. If the bedroom wall is the same wall as the bathroom fan's duct run, pay the extra for a dual-motor or three-motor unit.
Static Pressure Matters for Long Duct Runs
For duct runs longer than six feet or with more than one elbow, static pressure goes up significantly. Look at the CFM rating at 0.1 inch static pressure, not the free-air CFM. The 0.1 inch number is what the fan will actually deliver in a real install. Jen has a short straight duct, so any standard unit works. A friend with a curvier duct run had to upgrade to a higher-static-pressure unit.
The Code Question
Most jurisdictions do not require a permit for a like-for-like fan replacement in a single-family home. Adding new wiring, a new circuit, or moving the location does require a permit and possibly an inspection. If your project involves anything beyond swapping one fan in the same hole, call your building department. The phone call is free.
How to Choose an Energy Efficient Replacement Bathroom Exhaust Fan
Upgrading while swapping out a broken vent unit is smart, and choosing an energy efficient replacement bathroom exhaust fan brings long-term benefits. ENERGY STAR certified dual-motor fans cut electricity consumption greatly, run quieter, reduce bathroom moisture buildup and mold risks.
For homeowners prioritizing quietness and low utility bills, these efficient models are worth the small extra cost over basic single-motor fans. Renters can also recommend this style of fan to landlords during maintenance requests.
What My Mom's Rental Taught Me
My mom had her bathroom exhaust fan replaced last year. The landlord sent a handyman who used the cheapest single-motor unit he could find. The install was clean, but the fan is loud and her bedroom is right next to the bathroom. The lesson: even when you do not control the install, you can control the unit selection. If you are asking your landlord to replace a fan, suggest a specific dual-motor unit with a wireless remote. The price difference is usually thirty to fifty dollars more than the cheapest unit, which most landlords will approve.
The Bottom Line
A bathroom exhaust fan replacement is a forty-minute job for a careful homeowner with a voltage tester, a screwdriver, and a basic understanding of wire color codes. Mastering exactly how to replace exhaust fan in the bathroom lets you skip expensive contractor bills entirely. The two common mistakes are mismatching the duct size and connecting wires to the wrong terminals. Both are avoidable by measuring twice and photographing once. If you rent, the job belongs to your landlord. Your role is to make sure the result is a quiet dual-motor unit, not the cheapest single-motor box the installer had in the van.


Discussion (0)
Sign in to join the discussion