

I bought five wood fillers before I gave up on them. The first three were squeeze-tube kind. They cracked when they dried, shrank below the surface, and took 24 hours to cure. The last two were fast-dry formulas. They cured in 30 minutes, then shrank enough that I had to fill the hole a second time. I threw out four of the five bottles with the nozzle still half full because they had dried solid inside the tube.
That is when I started looking at the $2 bottle of super glue I had bought to fix a chair leg and never opened. I had no idea it could fill a hole, rebuild a chipped corner, or save a stripped screw. Over the last year I have used it for five wood repairs no renter should pay a handyman for. None of them involved gluing two pieces back together.
This is the short list, plus three things super glue is bad at.
Use 1: Capillary fill for hairline cracks and checking
The first thing super glue does that wood filler cannot is flow. Wood filler is a paste. It sits where you put it. If the crack is thinner than the tip of a putty knife, you have to press it in with your finger. Super glue is a thin liquid. It flows into the crack on its own through capillary action, the same way water climbs a paper towel.
My dining table had three small cracks along the grain. They were about the width of a credit card and 4 to 6 inches long. I put blue painter's tape along each side to keep the glue off the finish. I turned the bottle upside down over the crack and let one drop fall at each end and one in the middle. The glue disappeared into the crack within seconds. After 10 minutes it was hard. I sanded lightly with 220-grit, then 320. The cracks were invisible.
This only works for cracks narrower than about 2 millimeters. Once a crack is wider, the glue sets on the surface before it has finished flowing down, and you end up with a hard skin over an empty cavity. For anything wider than a credit-card-width, you need the next trick.
Use 2: Pasty fill for nail holes, dings, and small gouges
For anything from a picture-frame nail hole to a one-centimeter gouge, the trick is to make your own paste. Mix fine sawdust with a few drops of super glue until you get something that looks like wet sand. Press it into the hole with a putty knife or a piece of stiff cardboard. Let it cure for 10 minutes. Sand it flat.
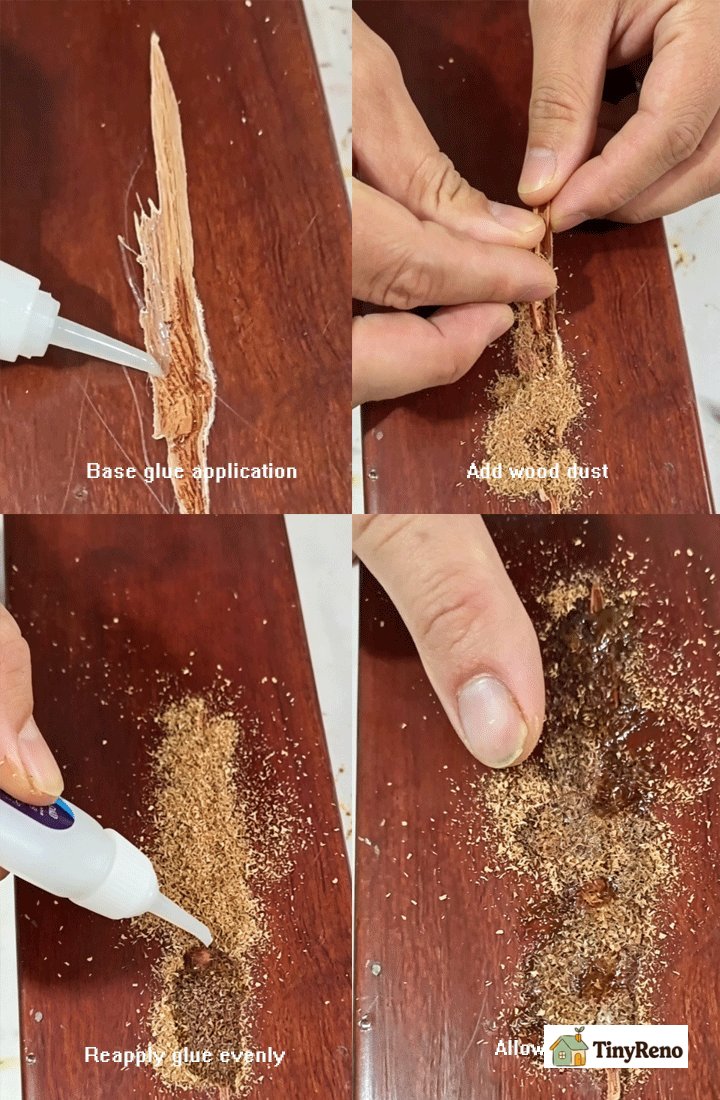
The wood shavings should be from the same type of wood if you can, but any fine sawdust works. I keep a small jar of shavings from the last time I sanded a piece of pine furniture. When I need filler, I tap a pinch into a paper cup, drop in 4 to 5 drops of glue, and stir with a toothpick for about 10 seconds. The paste sets fast, so I work in small batches. If the gouge is deeper than about 5 millimeters, I do it in two layers. The first fills the bottom. After it cures, I add a second on top, sand it flat, and the result is solid.
The reason I stopped buying wood filler is that this paste does what the store-bought stuff promises but never delivers. It does not shrink. It does not crack when it dries. It sands smooth. And it costs about $0.05 per hole instead of $8 per tube. The catch is that it is not paintable the way wood filler is. The glue dries to a translucent amber color. If the surrounding wood is stained dark walnut, the patch will be a shade lighter. I usually accept that, because the alternative is leaving a visible nail hole at move-out and losing part of my deposit.
Use 3: Screw rescue for stripped screw holes
This is the one that saved me from buying a whole new cabinet. A stripped screw hole is what happens when you tighten and loosen a screw in the same piece of particleboard too many times. The hole gets wider than the threads, the screw spins without biting, and the whole thing comes loose.
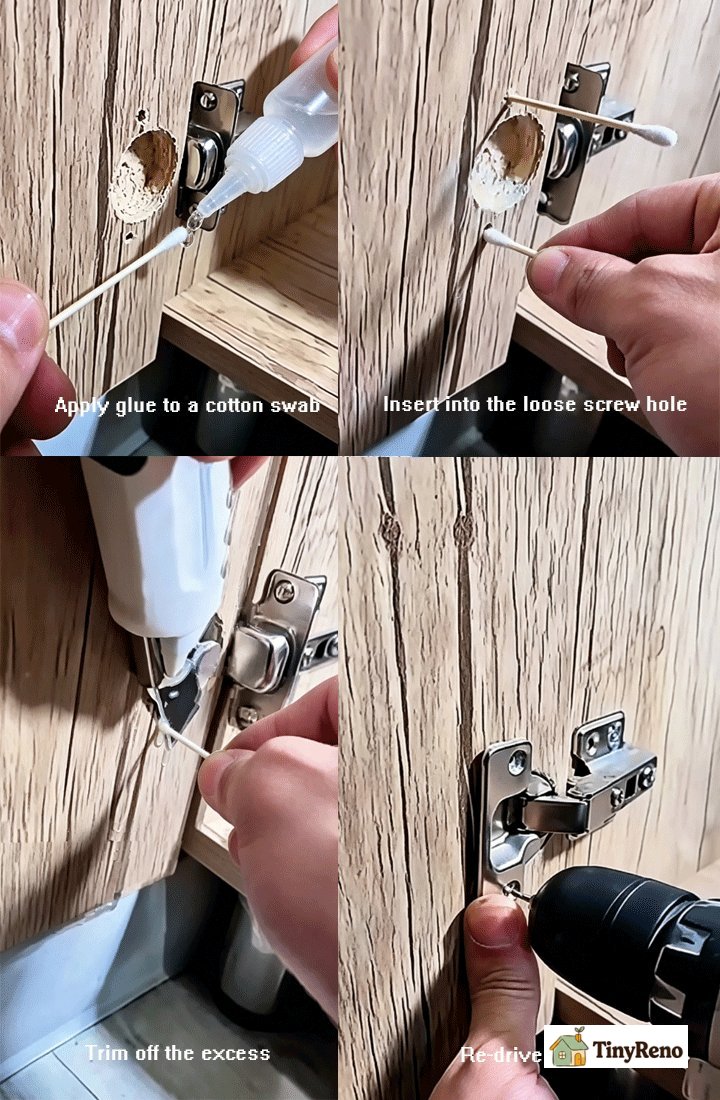
into the hole with the screw removed. Wait 30 seconds. The glue soaks into the loose fiber. Drop in a few wood shavings to bulk up the hole, then one more tiny drop of glue. After 10 minutes, the hole is essentially rebuilt. Drive the screw back in. It will bite like new.
I have used this on a cabinet door that would not stay shut, a bookshelf pulling away from the wall bracket, and a drawer slide that had walked itself loose over six months. The trick works on particleboard, MDF, and softwood. It does not work on hardwood — the wood is too dense for the glue to soak into. For hardwood, the right fix is a wood plug or a longer screw that reaches fresh wood. One warning the forums skip: do not use gel super glue for this trick. Gel is too thick to flow into the fiber. You need the thin liquid kind.
Use 4: Edge rebuild for chipped table corners and door edges
This is the one I am most proud of, because it saved me a $120 repair quote on a coffee table. The corner had a chunk about the size of two stacked quarters missing. The kind of damage that happens when you move a couch without lifting.
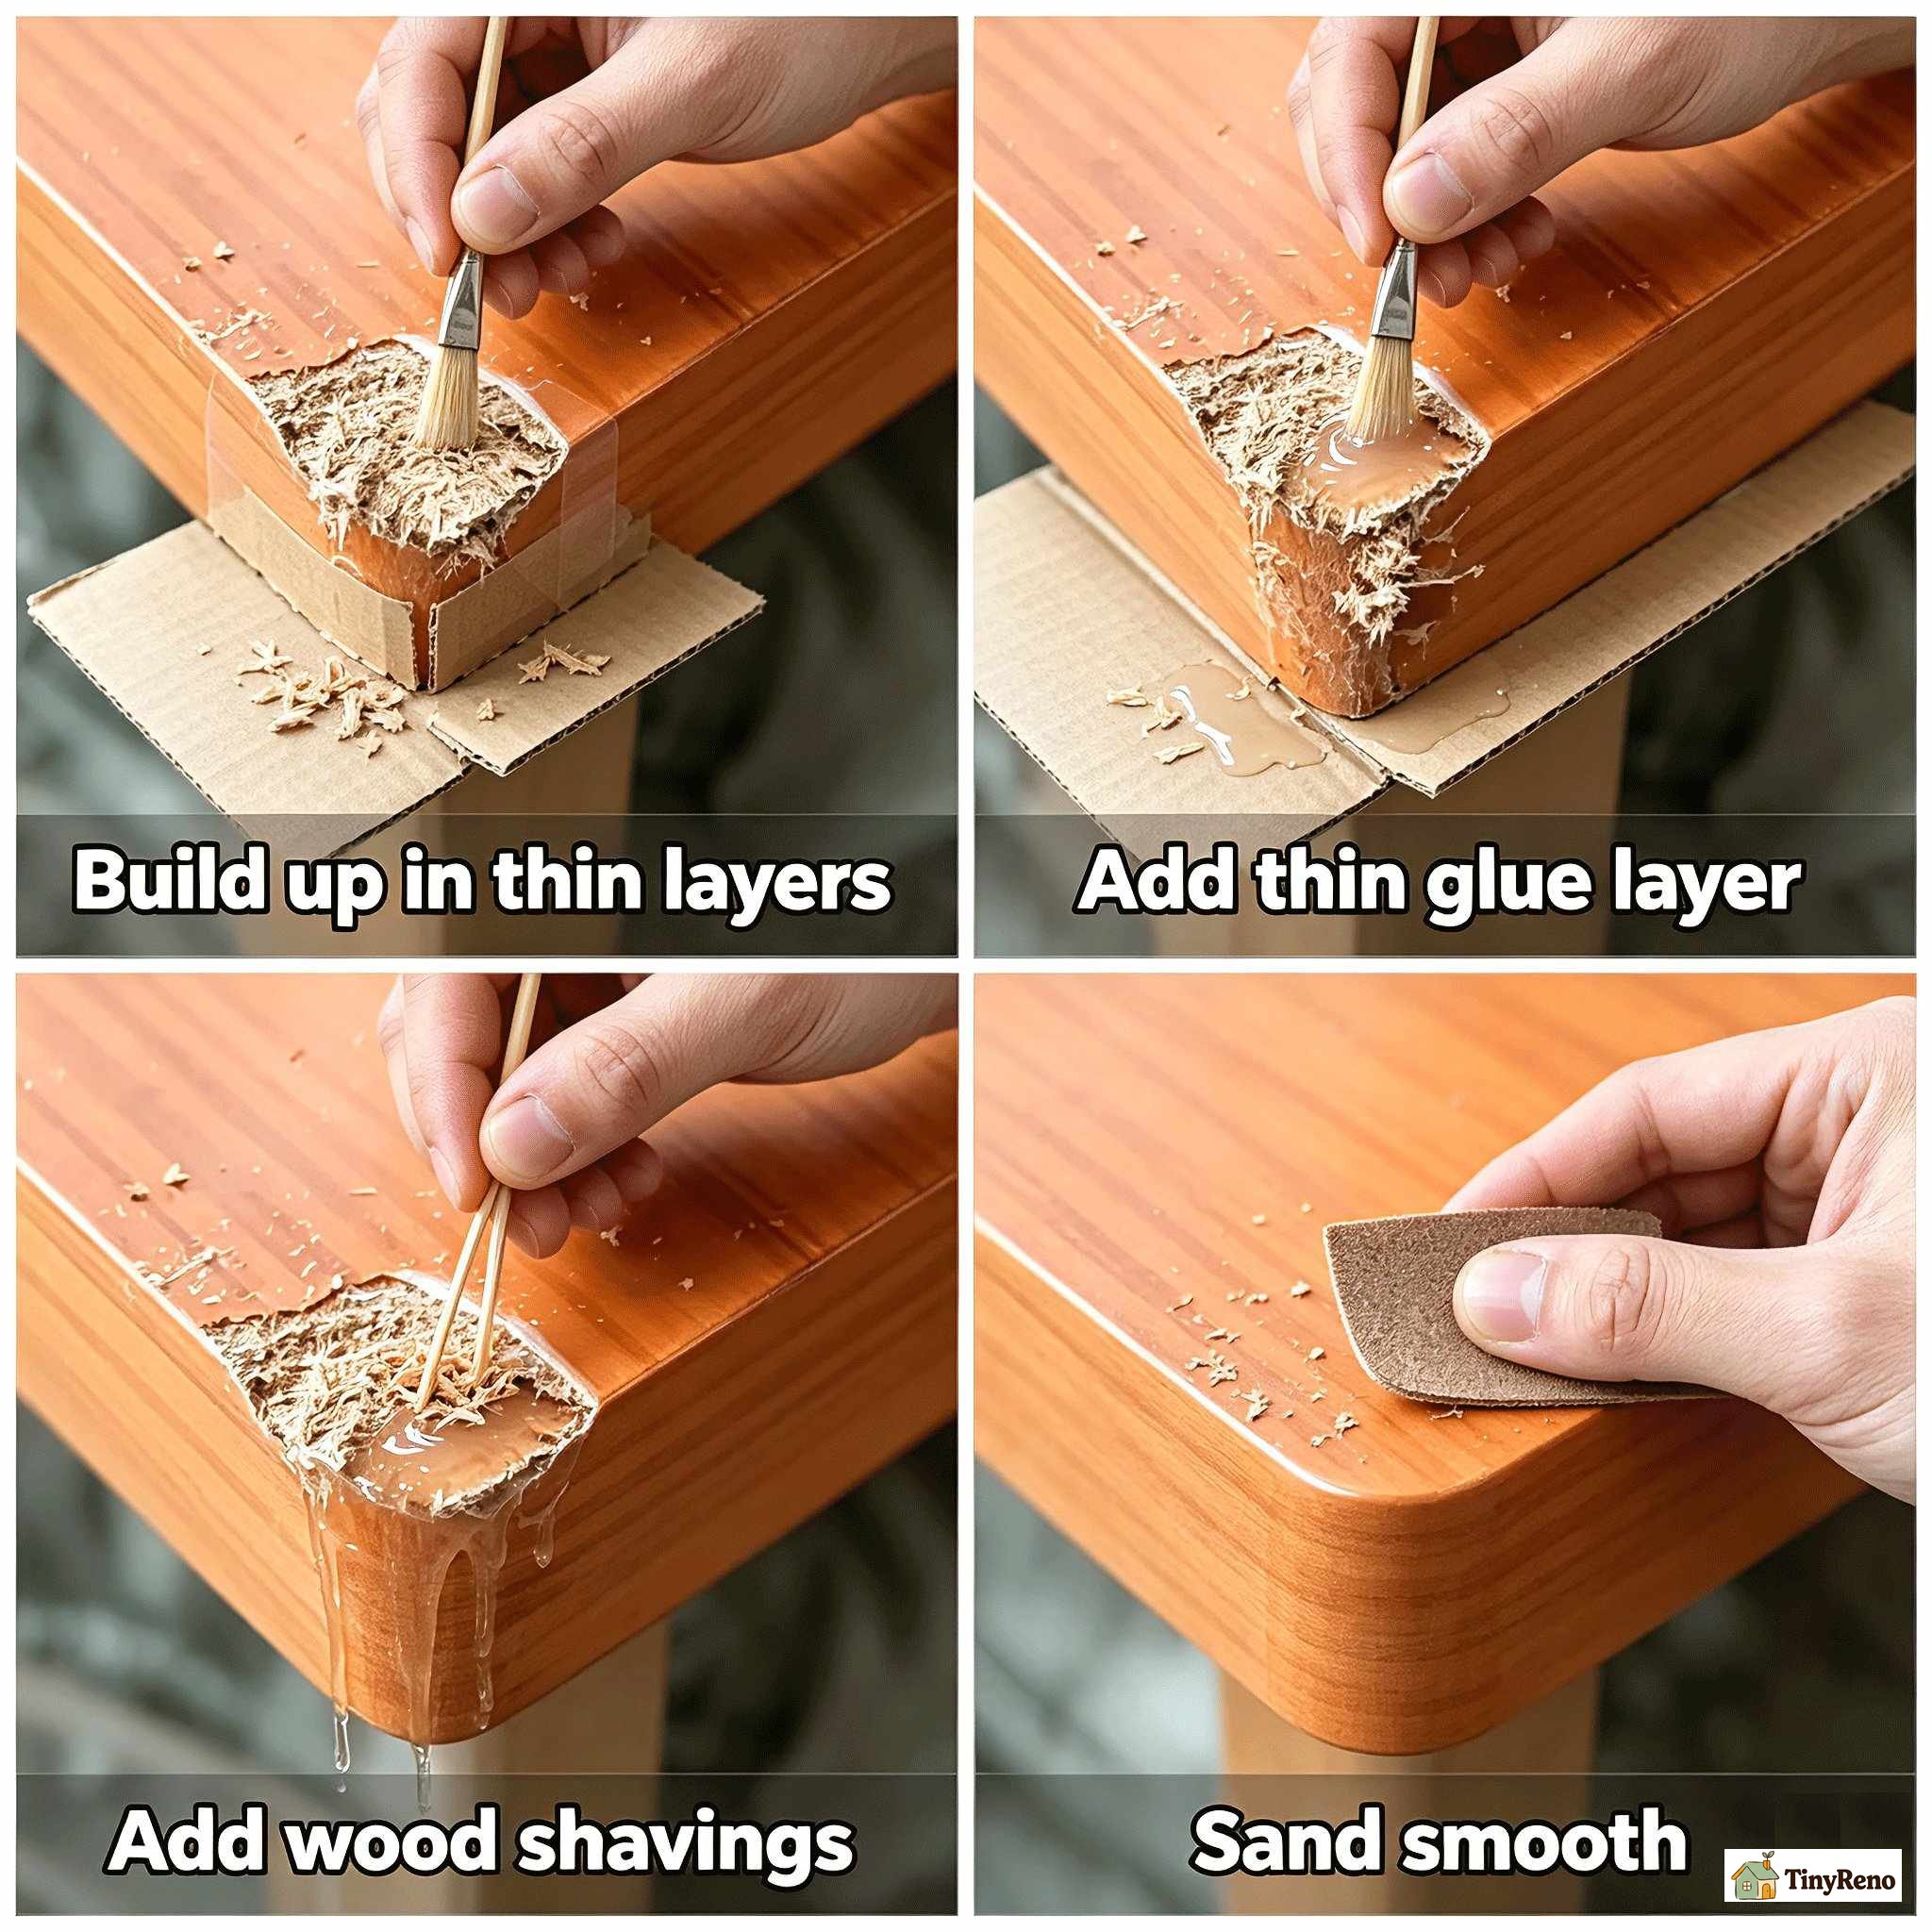
The trick is to build up the missing corner in thin layers. I taped a piece of cardboard against the underside of the corner to act as a form. Then I brushed a thin layer of super glue onto the exposed wood fibers, sprinkled fine shavings over the wet glue, pressed them in with a toothpick, and added one more drop of glue on top. After 15 minutes, that first layer was hard. I added a second thin layer, then a third. Three layers brought the corner back to within about a millimeter of the original shape. I sanded flat with 120-grit, then 220, then 320. The corner looked like a slightly rounded version of the original, not a perfect right angle, but close enough that no one noticed unless I pointed it out.
The key is the thin layers. If you try to rebuild the whole missing chunk in one pass, the glue generates heat as it cures, the inside stays soft, and the outside forms a hard skin. When you sand it, the soft middle crumbles and you are back where you started. Three or four thin layers is right for a chunk this size. For a larger piece, you might need six.
This trick also works for a small chip on the edge of a cabinet door, a dent on the corner of a desk, or the chipped lip of a cutting board. Any place where the damage is a clean missing chunk and the surrounding wood is solid.
Use 5: Temporary clamp when you are working alone
The last trick is not really a repair at all. It is a way to make a repair easier. Wood glue needs the two pieces to be clamped tight while it cures, which usually means either buying a clamp or asking someone to hold the piece for an hour. Super glue cures in seconds and does not need a clamp. So when I have a glue-up where one piece is hard to hold in position, I use super glue to tack it in place first, then go back with wood glue for the permanent bond.
I dry-fit the joint first to make sure the pieces line up. Then I separate them, apply wood glue to one surface, and put a tiny drop of super glue on just one corner of the joint, not the whole surface. I press the pieces together. The super glue grabs the corner in about 10 seconds, and the joint is held in perfect alignment. I walk away and let the wood glue cure for 24 hours. The super glue holds everything in place during that time, even though it is only bonded at one corner. When I sand the joint later, I sand away the corner that has the super glue, so the wood glue remains the primary bond. Super glue is part of the joint, but only as scaffolding.
What super glue is genuinely bad at
Three things I tried and would not try again, so you do not have to.
Using super glue as a substitute for wood filler across a wide area. I tried this on a 4-inch patch where the top of an old side table had lost its finish. The glue went on, cured, and sanded down. But the patch was harder than the surrounding wood. When I applied stain, the patch took it unevenly. It looked like a scar. For a wide-area patch you need real wood filler, or you need to refinish the entire surface. Super glue is for holes, cracks, and edges, not resurfacing.
Using super glue to fix a load-bearing joint. A friend asked me to re-glue the leg of a wooden chair that had snapped at the tenon. Super glue held it for about three weeks. Then the leg snapped again, in almost the same spot. Super glue is rigid when it cures. It does not flex. A chair leg sees flex every time someone sits down. The right glue for a load-bearing joint is yellow wood glue, which stays slightly flexible and resists shock. Super glue is for joints that do not move. Same lesson as a leaking toilet flapper — diagnose the cheap part first.
Using super glue to fill a hairline crack in a painted surface and expecting it to disappear. Super glue dries to a translucent amber. If you put it into a crack on a white-painted door, the patch will show as a faint yellow line. The right product for that is a paintable caulk or a tinted wood filler that matches the paint. Super glue works on bare wood, where the amber blends into the grain. On a painted surface, it stands out.
The takeaway for renters
A $2 bottle of super glue has replaced about $40 of wood filler and one cabinet I would otherwise have replaced. It is not the right tool for every wood repair. But for the five situations above, it is faster, cheaper, and more durable than what I was using before. Keep a bottle in the cleaning kit. Same reason I keep a small tension rod for the no-drill curtains I hung without drilling holes — when something breaks in a rental, the fix usually costs $3 and 10 minutes if you already have the right thing in the drawer.


Discussion (0)
Sign in to join the discussion